


Roof flashing is the bent metal or flexible membrane installed at every roof transition to redirect water away from joints and seams. The most common types you’ll find on a house are drip edge, step, valley, chimney (base and counter), vent pipe boot, skylight, kickout, continuous/apron, counter flashing, and ridge flashing. Together, these components guard every vulnerable point where water would otherwise find a path in.
Two quick anchors worth knowing before you read further: the International Residential Code (IRC R903.2) requires flashing at all roof/wall intersections and vulnerable transitions, and about 80% of roof leaks originate at flashing locations rather than in the field of the roof itself. If you’re in St. Charles County and suspect a flashing problem, Crowleyexteriors offers free inspections with no-obligation estimates.
- Drip edge — directs water off eaves and rakes into gutters
- Step flashing — L-shaped pieces woven with shingles at roof/wall junctions
- Valley flashing — W-shaped metal at the intersection of two roof planes
- Chimney flashing — a two-part base-and-counter system around the chimney perimeter
- Vent pipe boot — a rubber or metal collar sealing around plumbing stacks
- Skylight flashing — a four-sided system integrated with the skylight frame
- Kickout flashing — diverts water from step flashing runs into the gutter
- Continuous/apron flashing — a single long piece at horizontal roof/wall joints
- Counter flashing — the upper piece embedded in masonry that caps base flashing
- Ridge flashing — seals the peak on metal roofs and some tile systems
Key Takeaways
Roof flashing is the most common source of residential leaks, and catching problems early at any of the ten main flashing types costs a fraction of what interior water damage repairs run.
| Point | Details |
|---|---|
| 80% of leaks start at flashing | Flashings at transitions and penetrations fail far more often than the field of the roof. |
| Inspect twice a year | Check every spring and fall, plus after major storms, to catch problems before interior damage begins. |
| Highest-risk types to watch | Valleys, chimney systems, and EPDM pipe boots (which degrade in 10–15 years) cause the most leaks. |
| DIY vs. pro boundary | Pipe boot replacement and minor sealant work are DIY-friendly; chimney counter flashing and full valley replacement need a professional. |
| Crowleyexteriors free inspection | Crowleyexteriors provides free flashing inspections with a written scope and no-obligation estimate, backed by a 25-year guarantee. |
Table of Contents
- Why flashing failures cause most roof leaks
- Common roof flashing types: where each one lives and what it does
- What flashing materials actually hold up over time
- Core installation principles that separate good work from a future leak
- How to inspect your flashing and catch problems before they cost you
- What U.S. building code says about flashing
- When to call a pro and what a quality inspection covers
- A note from the Crowleyexteriors team
- Crowleyexteriors protects your home from the first inspection
- Sources
Why flashing failures cause most roof leaks
Flashing is where water concentrates. Every valley, chimney base, pipe penetration, and wall junction funnels runoff into a tight seam, and if that seam isn’t sealed correctly, water follows gravity straight into your roof deck. The damage progression is predictable and expensive: saturated decking leads to rotted sheathing, then wet insulation, then stained drywall, and eventually mold if the moisture goes undetected long enough.
“Early professional intervention is almost always more affordable than repairing interior water damage after a leak — fix flashing early to avoid drywall, insulation, and structural restoration costs.”
This Old House
The cost gap between a $150 sealant repair and a $3,000+ interior remediation job is not subtle. A loose step flashing piece or a cracked pipe boot that gets caught on a biannual inspection is a one-hour fix. The same problem discovered after a wet winter ceiling is a multi-trade project.
What to do: Inspect your flashing every spring and fall, after any major storm, and any time you notice a water stain inside. The sections below tell you exactly what to look for at each location.
Common roof flashing types: where each one lives and what it does
Here are the types of roof flashing homeowners encounter most often, with location, function, materials, and a quick note on whether DIY repair is realistic.
1. Drip edge
Where it lives: Along the eaves (bottom edge) and rakes (sloped sides) of the roof.
What it does: Drip edge is an L-shaped metal strip that guides water off the roof edge and into the gutter rather than letting it wick back under the shingles. Without it, capillary action pulls water behind the fascia board, which rots quietly for years.
Materials: Galvanized steel and aluminum are standard; copper is used on premium builds.
Install note: Drip edge goes under the underlayment on rakes and over it on eaves. Getting that sequence wrong is one of the most common installation errors. Drip edge is required by code for asphalt shingle roofs in most U.S. jurisdictions. Replacing a damaged section is a reasonable DIY job.
2. Step flashing
Where it lives: Along any roof/wall junction — think a dormer wall, a shed roof meeting a house wall, or a garage addition.
What it does: Step flashing consists of individual L-shaped pieces, one per shingle course, woven alternately with the shingles so water is always directed outward and down. It’s the correct method for any sloped roof meeting a vertical wall.
Materials: Galvanized steel (26 gauge G-90) or aluminum (0.025 in.) for most residential work; copper for premium or historic applications.
Install note: Each piece overlaps the one below by at least 2 inches. A single piece that lifts, corrodes, or gets bent flat by ice becomes a direct water entry point. Reseating a few loose pieces is DIY-friendly; replacing a full run requires removing and reinstalling the adjacent shingles and siding.
3. Valley flashing
Where it lives: The V-shaped channel where two roof planes meet.
What it does: Valleys carry more concentrated runoff than almost any other roof surface. Valley flashing — typically a W-shaped metal piece — keeps that water moving toward the gutters instead of pooling at the seam. Three styles exist: open, closed, and woven. Open valleys (exposed metal visible between shingle edges) generally last longest and are the easiest to inspect and repair. Closed and woven valleys look cleaner but are harder to service.
Materials: Aluminum, galvanized steel, or copper. Some installers use self-adhering ice-and-water membrane as a valley underlayment beneath the metal.
Install note: This is a high-risk leak zone. Full valley replacement is a pro job — it requires removing shingles on both planes and re-integrating the new metal correctly.
4. Chimney flashing system (base + counter)
Where it lives: All four sides of the chimney where it meets the roof.
What it does: Chimney flashing is actually a two-part system. The base flashing (sometimes called apron flashing) sits against the chimney and laps onto the roof surface. The counter flashing is embedded into the mortar joints above it and folds down over the base flashing, creating a telescoping seal that allows the chimney and roof to move independently. On the uphill side of a wide chimney, a cricket (a small peaked diverter) sheds water around the chimney rather than letting it dam up behind it.
Materials: Copper is the traditional choice for chimneys because it handles the thermal cycling and moisture exposure better than most alternatives. Galvanized steel and aluminum are common on budget jobs.
Install note: Chimney flashing is among the most complex flashing systems on a house. Differential movement between the masonry chimney and the wood-framed roof is constant, and that movement eventually breaks any rigid seal. This is a pro-only job for full replacement. Resealing minor gaps with roofing caulk is a temporary DIY measure, not a permanent fix.
5. Vent pipe boot (pipe flashing)
Where it lives: Around every plumbing vent stack that penetrates the roof.
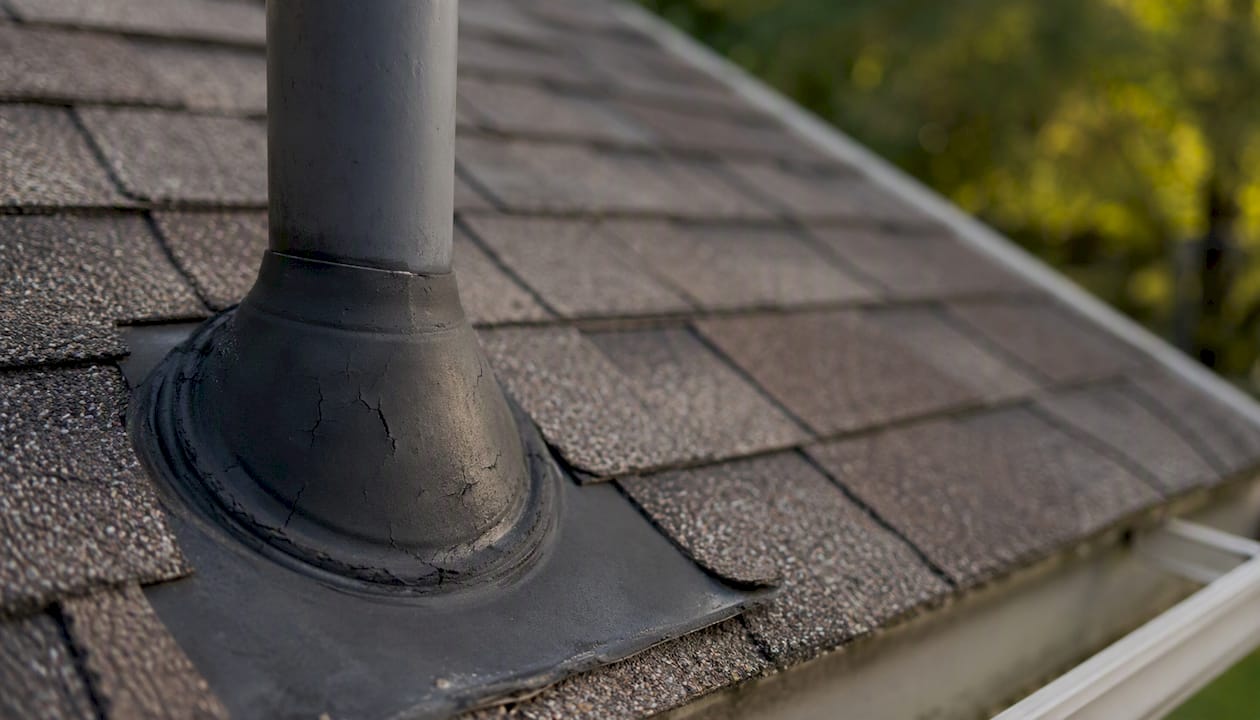
What it does: A pipe boot is a pre-formed collar, typically a rubber or EPDM sleeve over a metal base, that seals the gap between the pipe and the surrounding shingles. It’s one of the most common leak sources on older roofs.
Materials: EPDM rubber over a galvanized or aluminum base is standard. Lead boots last longer but are less common in new residential work. EPDM boots typically degrade after 10–15 years, cracking and pulling away from the pipe.
Install note: Replacing a pipe boot is one of the most DIY-accessible flashing repairs on a roof. The old boot slides off, the new one slides on and nails down, and the surrounding shingles are re-integrated. Budget 1–2 hours and roughly $20–$50 in materials.
6. Skylight flashing
Where it lives: Around the perimeter of any skylight.
What it does: Skylight flashing is a four-sided system — head flashing at the top, step flashing on the sides, and sill flashing at the bottom — that integrates the skylight frame with the surrounding shingles and underlayment. Many skylight manufacturers supply a proprietary flashing kit matched to their frame dimensions.
Materials: Aluminum is most common; some premium skylights use copper-clad or stainless components.
Install note: Skylight leaks are often misdiagnosed as condensation. Before assuming the skylight itself is defective, check the flashing perimeter for lifted pieces or failed sealant. Full skylight flashing replacement is a pro job because it requires precise integration with the skylight frame and the surrounding roof system.
7. Kickout flashing
Where it lives: At the bottom end of a step flashing run, where the roof edge meets a vertical wall and a gutter begins.
What it does: Kickout flashing is a small but critical piece that deflects water from the step flashing run outward into the gutter rather than letting it run down the wall behind the siding. It’s one of the most commonly omitted pieces on older roofs, and its absence causes hidden rot inside the wall cavity that can go undetected for years.
Materials: Galvanized steel or aluminum, pre-formed or field-bent.
Install note: The IRC specifically requires kickout flashing where an eave meets a vertical sidewall. If your home was built before this requirement was widely enforced and you have a step flashing run ending at a wall, check whether kickout flashing is present. Adding it is a relatively straightforward repair, but it does require pulling back the bottom of the siding to install correctly. If water intrusion has already occurred behind the siding, check out Crowleyexteriors’s siding services for a full assessment.
8. Continuous/apron flashing
Where it lives: At horizontal roof/wall junctions — where a flat or low-slope roof section meets a vertical wall, or at the base of a dormer front wall.
What it does: Unlike step flashing (which uses individual pieces per shingle course), continuous flashing is a single long piece that runs the full width of the junction. It’s simpler to install but requires expansion joints on long runs because metal expands and contracts with temperature changes. Without those joints, the flashing buckles or pulls away from the wall.
Materials: Aluminum or galvanized steel for most residential applications.
Install note: Long continuous flashings without expansion allowance are a known failure point. If you see a buckled or wavy metal strip at a horizontal wall junction, that’s the cause.
9. Counter flashing
Where it lives: Embedded into mortar joints or a reglet (a saw-cut groove) in masonry, folding down over base flashing below.
What it does: Counter flashing is the upper half of the two-part chimney or masonry wall flashing system. It doesn’t attach to the roof surface at all — it attaches to the masonry and overlaps the base flashing below, allowing the two surfaces to move independently. This is what makes the chimney system durable; a single rigid piece would crack within a few seasons.
Materials: Copper is preferred for masonry applications. Aluminum and galvanized steel are used in budget installations.
Install note: Cutting a reglet into brick or stone and sealing counter flashing into it requires a grinder and masonry sealant. This is firmly in pro territory. A contractor who skips the reglet and just surface-applies counter flashing with caulk is cutting a corner that will fail.
10. Ridge flashing
Where it lives: Along the peak of a metal roof or tile roof system.
What it does: On metal and tile roofs, the ridge cap alone doesn’t fully seal the peak. Ridge flashing (sometimes a foam closure strip or a formed metal cap) seals the gap between the two opposing roof planes at the top. On asphalt shingle roofs, ridge cap shingles typically handle this function without a separate metal piece.
Materials: Matches the primary roofing material — aluminum or steel for metal roofs, mortar-set or dry-laid for tile.
Install note: Ridge flashing is rarely a DIY repair on metal or tile systems because it requires matching the existing profile and re-integrating fasteners correctly.
11. Gutter apron flashing
Where it lives: Between the roof deck edge and the back of the gutter.
What it does: Gutter apron flashing is an L-shaped strip that bridges the gap between the roof deck and the gutter, preventing water from dripping behind the gutter and rotting the fascia. It’s often confused with drip edge, but it extends further back under the shingles and hooks into the gutter.
Materials: Aluminum or galvanized steel.
Install note: If you’re replacing gutters, adding gutter apron flashing at the same time is straightforward and prevents a common fascia rot problem. Crowleyexteriors’s gutter services include this integration as part of a full installation.
What flashing materials actually hold up over time
The material your flashing is made from determines how long it lasts and how well it handles your local climate. Here’s a practical breakdown.
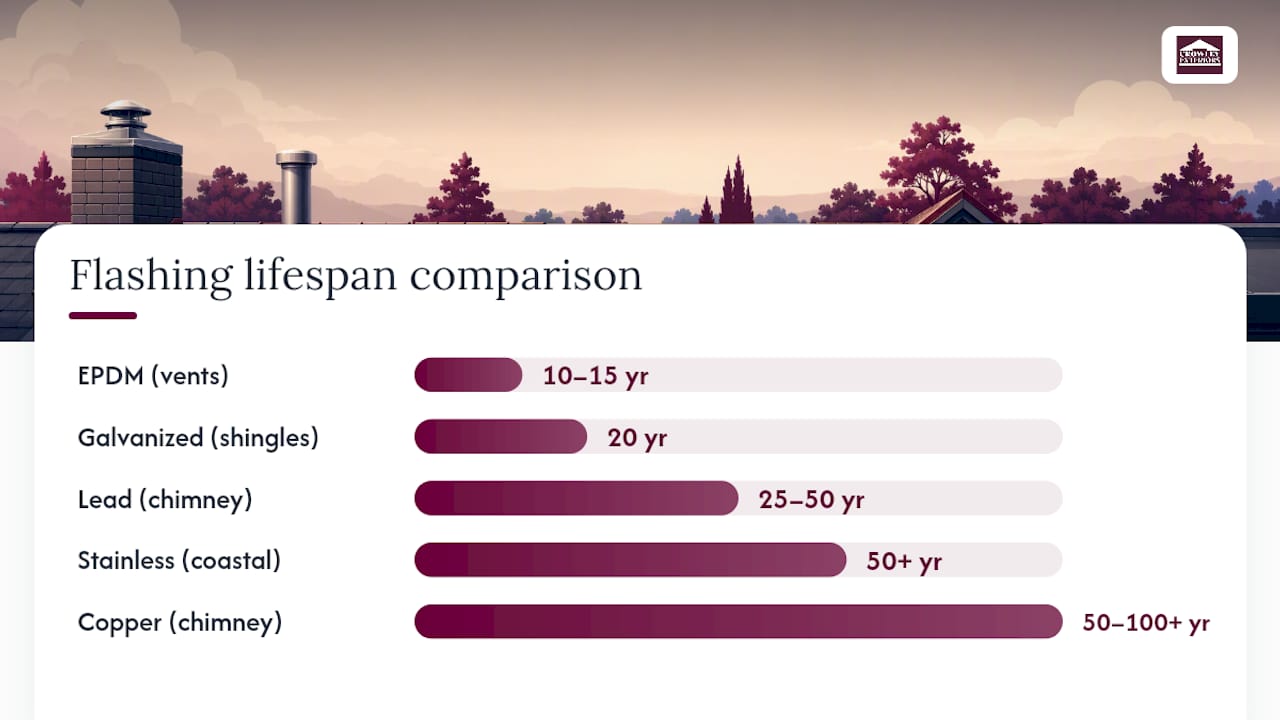
| Material | Typical Lifespan | Best Use Cases |
|---|---|---|
| Galvanized steel (26 ga. G-90) | 20 years | General residential; asphalt shingle roofs |
| Aluminum (0.025 in.) | 20 years | Asphalt shingle; lightweight applications |
| Copper (16 oz.) | 50–100+ years | Chimneys, slate, tile, historic homes |
| Stainless steel (304/316) | 50+ years | Coastal, high-corrosion environments |
| EPDM/rubber pipe boot | 10–15 years | Vent pipe penetrations |
| Lead | 25–50 years | Chimney, custom profiles (less common in new builds) |
A few things the table doesn’t capture: aluminum corrodes faster in areas with acid rain, so if you’re in a region with significant air pollution or industrial activity, galvanized steel or stainless is a better call. Copper is the premium choice for chimneys and masonry applications because it handles thermal cycling without cracking, and it develops a patina that actually improves corrosion resistance over time. Just don’t mix copper with aluminum directly — galvanic corrosion will eat the aluminum.
For metal and tile roofs, off-the-shelf flashing profiles often don’t fit — installers typically need manufacturer-specific pieces or custom-formed sections bent on a brake. Asphalt shingle roofs use standardized profiles available at any roofing supply house.
Climate notes:
- Freeze-thaw cycles (Missouri, Midwest): Galvanized steel handles freeze-thaw well; EPDM pipe boots degrade faster with repeated freezing. Ice-and-water shield underlayment beneath valley metal is worth the extra cost.
- Coastal/salt air: Stainless steel 304/316 or copper. Aluminum and standard galvanized steel corrode noticeably faster within a few miles of saltwater.
- High UV/heat: EPDM degrades faster under intense UV; silicone-based pipe boots hold up better in very sunny climates.
Pro Tip: When replacing any flashing, match the new material to the existing metal wherever possible. Mixing dissimilar metals at contact points accelerates corrosion for both.
Core installation principles that separate good work from a future leak
The single most important installation rule is sequencing. Flashing must be installed in the correct order relative to the underlayment and shingles, or water will find a path behind it regardless of how well it’s sealed.
Here’s the correct sequence for a standard asphalt shingle roof:
- Drip edge at eaves — installed over the fascia, under the underlayment.
- Underlayment — rolled out over the drip edge at eaves, covering the deck.
- Ice and water shield — applied at eaves, valleys, and any high-risk penetration zones before the field underlayment in those areas.
- Drip edge at rakes — installed over the underlayment (opposite of eaves).
- Valley metal — laid over the underlayment in the valley, centered, and fastened at the edges only.
- Starter course and field shingles — installed with step flashing pieces woven in at every wall junction, one L-shaped piece per shingle course.
- Counter flashing and reglet work — completed after the base/step flashing is in place, embedded into masonry or sealed into a cut reglet.
- Ridge details — installed last, capping the peak.
Overlap and nailing: Step flashing pieces should overlap by at least 2 inches. Valley metal should be nailed only at the outer edges, never through the center, so it can flex. Drip edge nails every 12 inches.
Sealant: Roofing caulk and sealant are a supplement, not a substitute for correct mechanical flashing. Sealant fills minor gaps and seals nail heads; it is not designed to hold a flashing piece in place or bridge a structural gap. Any installation that relies primarily on sealant to keep water out will fail within a few years.
Pro Tip: Stop and call a pro when the work requires cutting into brick or stone for a reglet, torch-applied membrane, lead work, or any roof access above a single story that exceeds your comfort level. A fall from a roof is not a recoverable mistake.
How to inspect your flashing and catch problems before they cost you
Inspect your flashing at least twice a year — spring and fall are the standard schedule. After any significant storm, add a quick visual check. New roofs benefit from checks at 6, 12, and 24 months post-installation to catch any settling or installation issues early.
What to look for:
- Lifted, bent, or missing step flashing pieces along wall junctions
- Rust streaks running down the roof or into gutters (corroding valley or drip edge metal)
- Cracked, shrunken, or separated EPDM pipe boots
- Gaps or dried-out sealant at chimney base flashing
- Buckled or wavy continuous flashing at horizontal wall junctions
- Missing kickout flashing at step flashing terminations
- Water stains on interior ceilings or walls directly below roof penetrations
Simple DIY repairs (low risk, 1–3 hours):
- Replace a cracked pipe boot: slide off the old boot, clean the pipe, slide on a new EPDM boot, nail the base flange, re-integrate surrounding shingles.
- Re-seal minor gaps at chimney base with roofing caulk (temporary fix; schedule a pro inspection if the gap is recurring).
- Replace a damaged drip edge section: remove the affected shingles, swap the metal, re-nail, replace shingles.
Pro-only repairs:
- Full chimney counter/base flashing replacement
- Full valley replacement
- Reglet cutting and counter flashing re-embedding
- Any repair requiring significant shingle removal across multiple courses
“Waiting until a flashing leak causes interior damage multiplies the total repair cost. Drywall, insulation, and structural restoration add up fast — a small flashing repair caught early is almost always a fraction of the cost of a reactive fix.”
This Old House
Rough cost guidance: minor sealant work runs $100–$300. Replacing a pipe boot professionally is typically $150–$400. Partial step flashing replacement runs $300–$800 depending on the run length. Full chimney flashing system replacement can reach $1,500–$3,000 or more, and that’s before any interior damage remediation. The math on early intervention is straightforward.
What U.S. building code says about flashing
The International Residential Code sets the baseline. IRC R903.2 requires flashing at all roof/wall intersections, changes in roof slope, and overhangs — and specifically mandates kickout flashing where an eave meets a vertical sidewall to divert water into gutters rather than down the wall.
“Flashing shall be installed at wall and roof intersections, wherever there is a change in roof slope or direction, and around roof openings. Where flashing is of metal, the metal shall be corrosion-resistant with a minimum thickness of not less than 0.019 inch (0.48 mm) corrosion-resistant metal.”
IRC R903.2 (via Green Building Advisor)
The practical implication: if your roof was built or re-roofed without kickout flashing at wall junctions, it’s out of compliance with current IRC standards, and the wall cavity behind the siding may already have moisture damage.
Drip edge is required by code for asphalt shingle roofs in most U.S. jurisdictions under IRC R905.2.8.5. Many older homes predate this requirement.
One important caveat: local amendments to the IRC are common. Missouri and St. Charles County may have additional requirements or stricter specifications than the base IRC language. Before any permitted roofing work, check with your local building department or ask your contractor to confirm current local code requirements. A reputable contractor will pull the permit and handle this for you.
When to call a pro and what a quality inspection covers
Call a professional when you see any of the following: visible water stains on interior ceilings or walls, a chimney flashing system that’s more than 15 years old, a step flashing run with multiple lifted or corroded pieces, or any repair that requires roof access above a single story or work on masonry.
A thorough professional flashing inspection should cover:
- Reglet and counter flashing condition — is the counter flashing still embedded, or has it pulled free?
- Sealant integrity — dried, cracked, or missing sealant at chimney base and skylight perimeters
- Step flashing overlap — are all pieces correctly lapped and integrated with the siding above?
- Valley condition — corrosion, lifted edges, or debris accumulation in the valley channel
- Pipe boot age and condition — EPDM cracking or separation from the pipe
- Hidden rot — soft spots in the decking near any flashing location
- Kickout flashing presence — especially at step flashing terminations meeting gutters
What a good estimate includes: a line-item breakdown of flashing work by location, the materials specified (gauge, material type), labor, and warranty terms. Crowleyexteriors provides free roof inspections with no-obligation estimates and backs its roofing work with a 25-year guarantee, so you know exactly what you’re getting before any work begins.
Questions worth asking any contractor:
- Will you pull a permit for this work?
- Are you replacing the full flashing system or just re-sealing?
- What material gauge and type are you using?
- What’s the warranty on labor and materials?
For guidance on choosing a qualified roofing contractor, the contractor selection resource from REPS of Texas covers the key vetting questions that apply regardless of your location.
A note from the Crowleyexteriors team
St. Charles County’s weather puts flashing through its paces every year. Freeze-thaw cycles in January and February stress every metal joint on the roof; spring storms bring wind-driven rain that finds any gap in a step flashing run; summer heat accelerates EPDM pipe boot degradation. We’ve been inspecting and repairing roofs in this area for over 25 years, and the pattern is consistent: the homes that avoid major interior water damage are the ones where flashing gets checked regularly, not just when a ceiling stain appears.
Our inspection process covers every flashing location on the roof, with photos and a written scope so you know exactly what’s there and what needs attention. We offer free inspections and no-obligation estimates because we’d rather you make an informed decision than a rushed one. The 25-year guarantee on our roofing work reflects how we approach every job.
Crowleyexteriors protects your home from the first inspection
When flashing fails in St. Charles County, the damage rarely stops at the roof. It moves into the wall cavity, the insulation, and eventually the living space. Crowleyexteriors gives homeowners a clear picture of their flashing condition before that happens.

A free inspection from Crowleyexteriors covers every flashing location on your roof: step flashing runs, valley metal, chimney systems, pipe boots, drip edge, and kickout flashing. You get a written scope, photos, and a no-obligation estimate. No guesswork about what needs fixing or what it will cost.
With over 25 years serving St. Charles County, a 25-year workmanship guarantee, and experience handling storm damage and insurance claims, Crowleyexteriors is the local team that knows what Missouri weather does to a roof. Schedule your free inspection today and know exactly where your roof stands.
Sources
- What Is Flashing on a Roof? (The Roofing Brief)
- Understanding Roof Flashing: Essential Protection for Every Home (GAF)
- All About Roof Flashing (Green Building Advisor)
- What Is Roof Flashing? (This Old House)