

If your roof shows lifted or curling shingles, missing tabs, bare patches where granules have worn away, or damaged edges and flashing, that’s a strong indicator of wind damage. The same goes for water stains on ceilings after a storm. Photograph everything, keep the damaged pieces you find in the yard, and schedule a professional inspection before you touch anything else.
TL;DR:
- Most wind damage occurs along the roof edges, with lifted, curled, or unsealed shingles indicating gradual wind stress rather than a single impact.
- Missing shingles or strips suggest wind commencing at loose edges or ridge caps and progressively peeling away, often leaving behind granule loss and debris.
- Inspection should begin from the ground with binoculars and proceed to attic checks for water stains, daylight, or soaked insulation; climbing is unsafe if the roof is wet or unstable.
- Damage thresholds vary by wind speed: over 39 mph causes minor effects, while over 74 mph can lead to major cover loss and structural risks, depending on roof construction quality.
- Immediate post-storm documentation with photos within 24 to 72 hours speeds up insurance claims and helps distinguish between minor cosmetic damage and critical structural issues.
Table of Contents
- Common visible signs of wind damage on the roof and related components
- How to inspect your roof for wind damage safely and what to photograph
- Wind speed thresholds and construction factors that influence damage severity
- Prioritized action checklist: what to do after you find possible wind damage
- Prevention and maintenance steps to reduce future wind damage risk
- Crowley Exteriors’ credentials and the publisher’s 24-72 hour photo checklist
- Author note: priorities for homeowners after wind events
- How Crowley Exteriors can help: inspections, emergency tarping, repairs, and claim support
- Sources
- FAQ
Common visible signs of wind damage on the roof and related components
Wind rarely tears a roof apart in one dramatic motion. It works at the edges first, prying at seals and lifting anything not fully bonded down. The clearest sign is shingles that are lifted, curled, or unsealed along their tab lines, often in a diagonal pattern running up the roof slope. That diagonal pattern matters: it tends to point to gradual aging and repeated wind stress rather than a single impact event, according to research on shingle wind and hail performance.
Missing shingles tell a different part of the story depending on how much is gone. A single missing tab usually means one weak seal failed. A missing strip, where an entire row has peeled away, suggests the wind found a starting point, like a loose edge or ridge cap, and kept going from there.
Granule loss is easy to miss from the ground but shows up in two places: bare, shiny patches on the shingle surface and dark grit collecting in gutters or at downspout outlets. Granules protect the asphalt mat underneath from UV damage, so bare spots accelerate aging even if no leak appears right away.
Beyond the shingles themselves, check these components:
- Drip edge and starter strip: missing or bent metal along the roof’s lower edge, often the first piece to go.
- Ridge caps: cracked, lifted, or missing caps along the roof’s peak.
- Flashing: loose or bent metal around chimneys, vents, and skylights.
- Soffit and fascia: dents, gaps, or pieces pulled away from the roofline.
- Gutters: sections pulled loose from fascia boards or dented by flying debris.
Smaller clues add up too. Nails backing out of their shingles, tabs that have flipped upward instead of tearing off, and torn shingle corners scattered across the lawn all point to wind stress even when the roof looks intact from the street.
RICOWI’s post-storm survey guidance catalogs these exact patterns missing perimeter metals, displaced roof coverings, and shifted facade materials as the standard markers investigators document when assessing wind events.
How to inspect your roof for wind damage safely and what to photograph
Start on the ground. Walk the perimeter of your house and look up at the roofline with binoculars rather than climbing right away. Scan for the signs already covered: lifted shingles, gaps in the roofline, bent flashing, and anything hanging loose. Check gutters and downspouts for granule buildup and shingle fragments, since that debris often lands there before you notice anything on the roof itself.
Head to the attic next, if you have safe access. Look for:
- Wet or matted insulation, which points to active water intrusion.
- Spots of daylight showing through the roof deck, meaning a gap or hole exists somewhere above.
- Displaced insulation near vents or eaves, often pushed around by wind-driven rain entering through a damaged spot.
- Water stains on rafters or the underside of the decking, which can mean the leak has been active for a while.
Skip the climb entirely if the roof is wet, steeply pitched, or you can already see structural sagging or major shingle loss. That’s a job for a professional with the right harness and footing, not a homeowner on a weekend.
If conditions are safe and you do go up, wear rubber-soled shoes, use a ladder with a stabilizer, and never work alone. For photos, capture the whole roof from each side of the house first, then move in for close-ups of eaves, rakes, and valleys where damage concentrates. Photograph interior stains with a tape measure in frame for scale, and set your phone’s date stamp so timing lines up with the storm date on your insurance claim.
Pro Tip: Photograph damage within 24 to 72 hours of the storm; adjusters and contractors move faster when the timeline between weather event and documentation is tight and undeniable.
Wind speed thresholds and construction factors that influence damage severity
Wind speed alone doesn’t determine how much damage your roof takes, but it sets the range of what’s likely. The National Weather Service’s wind threshold guidance outlines how damage severity tends to climb with sustained wind speed and gusts.
| Wind speed range | Typical classification | Common roof impact |
|---|---|---|
| Over 39 mph | Tropical storm strength | Minor shingle lifting, some siding damage |
| Over 74 mph | Hurricane force | Major roof cover loss, structural risk depending on construction |
Construction quality changes the outcome at every speed band. Older roofs, three-tab shingles, and roofs installed with poor nailing patterns fail at lower wind speeds than newer architectural shingle systems. IBHS field surveys after Hurricane Harvey found that more than half of surveyed shingle roofs showed some cover loss, with three-tab shingles failing more frequently than architectural ones. The same surveys noted that deck and underlayment damage stayed relatively rare, meaning most wind events hit the shingles and accessories first, not the structure underneath. That distinction is why quick action after cover loss matters: it usually protects against secondary water damage rather than structural failure.
Prioritized action checklist: what to do after you find possible wind damage
Once you’ve spotted likely wind damage, the order of your next moves affects both your safety and your insurance outcome.
- Contain interior damage first. Move furniture, place buckets under active drips, and cover exposed areas with a tarp if you can do so safely from inside or without climbing.
- Call for emergency tarping if the roof has an open gap exposing the deck to more rain.
- Document everything using the photo and video checklist from the inspection step, including close-ups, wide shots, and any shingles or debris you can safely collect as physical evidence.
- Preserve samples and receipts. Keep a torn shingle or piece of flashing in a bag, and save receipts for any emergency repairs or temporary materials.
- Contact a licensed roofer for an estimate and temporary fix, then notify your insurer, unless your policy requires notification first; check your policy’s timeline requirements before deciding the order.
Insurance claims move faster when the paperwork is clean and the timeline is tight. That said, be careful who you let on your roof in the days after a storm.
- Storm-chasing contractors often show up uninvited, pressure for same-day signatures, and ask for large upfront deposits.
- A legitimate roofer will offer a written, itemized estimate and answer questions about licensing, insurance, and local references without hesitation.
- Ask any inspector how they document damage, whether they photograph before and after repairs, and how long their workmanship guarantee lasts.
Store every estimate you receive, compare them side by side, and only move toward filing a claim once you have a clear picture of the scope and cost of repairs.
Prevention and maintenance steps to reduce future wind damage risk
Most wind damage traces back to small maintenance gaps that widen over time. A few seasonal habits close those gaps before the next storm arrives.
- Clear gutters at least twice a year so wind-driven rain has somewhere to go besides under your shingles.
- Trim overhanging branches that can scrape shingles loose or snap onto the roof during high winds.
- Inspect flashing and ridge caps each spring and fall for lifted edges or cracked sealant.
- Check attic ventilation to prevent moisture buildup that weakens decking from underneath.
When it’s time to replace a roof, a few upgrades meaningfully improve wind performance: sealed roof decking, ring-shank nails instead of smooth shanks, reinforced starter strips, and locked-down ridge caps. IBHS research on aging shingles recommends these FORTIFIED-style measures specifically because they reduce water intrusion risk after a shingle failure, not just the odds of the failure itself.
A rough rule for deciding between repair and replacement: if damage covers roughly a quarter to a third of the roof, replacement often makes more financial sense than a series of patch repairs. Beyond the roof itself, reinforcing your garage door and keeping loose yard debris secured reduces the odds of wind-driven impact damage elsewhere on the house.
Pro Tip: A roof past 20 years old with any visible granule loss is a strong candidate for a full inspection before the next storm season, not after.
Crowley Exteriors’ credentials and the publisher’s 24-72 hour photo checklist
A local exterior services company with extensive experience offers roof repair, replacement, inspections, siding, gutters, and windows services. Some roofing jobs may come with a workmanship guarantee.
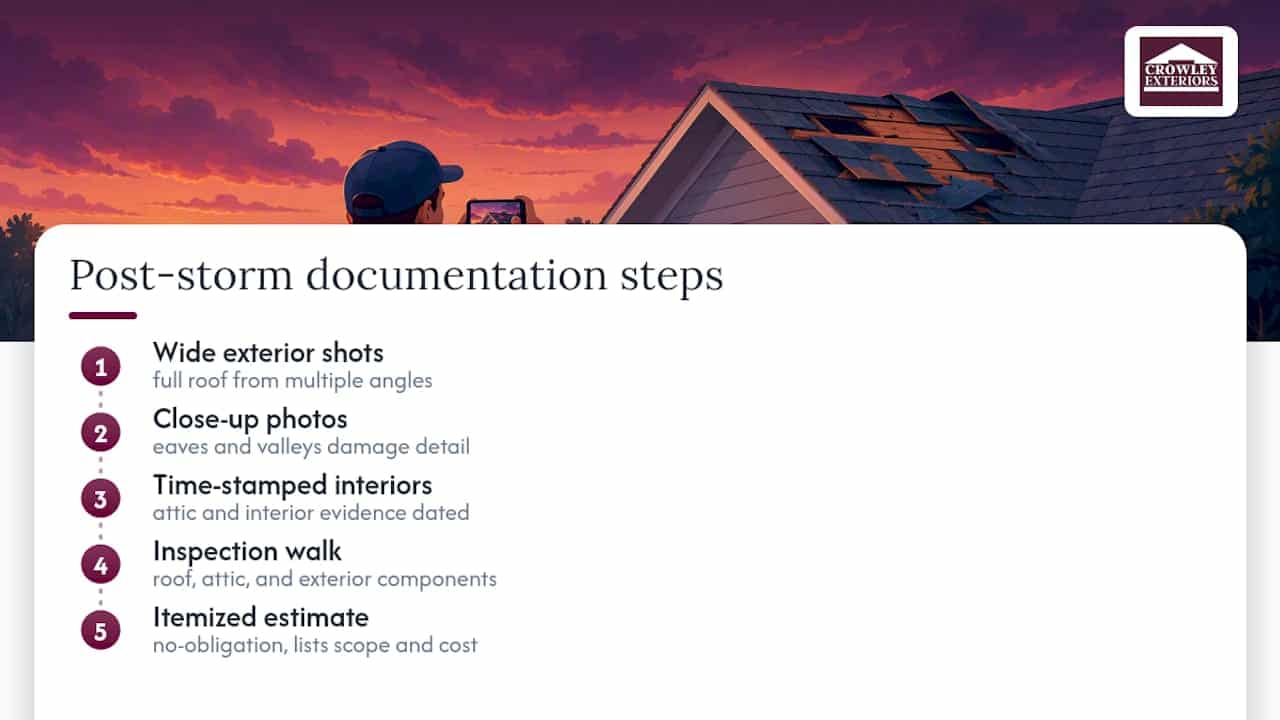
The photo checklist outlined earlier in this article mirrors the approach Crowley uses with homeowners after a storm: wide shots of the full roof, close-ups of eaves and valleys, and time-stamped interior photos, all gathered within 24 to 72 hours while the damage is fresh and easy to tie to a specific weather event. That speed matters because insurers and contractors both move faster with a clear, dated record in hand.
A typical inspection includes a walk of the roof, attic, and exterior components, followed by a no-obligation, itemized estimate so homeowners know the scope and cost before committing to anything.
Author note: priorities for homeowners after wind events
The instinct after a storm is to decide fast: replace, repair, or ignore it and hope for the best. Slow down on that decision, but not on documentation. Photograph everything within a few days, keep your receipts, and get a written estimate before you commit to a contractor.
A temporary tarp and a phone call to a trusted local roofer solve most immediate problems. Full replacement can usually wait until you’ve compared at least one or two estimates. Watch for anyone who wants a signature the same day they knock on your door: legitimate roofers give you time to think, storm chasers don’t.
— Mario
How Crowley Exteriors can help: inspections, emergency tarping, repairs, and claim support
Spotting the signs is the first step. Getting a straight answer about what they mean for your specific roof is the harder part, and that’s where a free, no-obligation inspection earns its cost.

Crowley Exteriors offers a few paths depending on what you found during your own walkthrough:
- A full roof inspection and leak detection visit to confirm what’s damaged and what’s cosmetic.
- Emergency tarping if you have an active leak or exposed decking, paired with guidance from our storm damage first-steps guide.
- Insurance claim assistance so your documentation lines up with what an adjuster needs to see.
- A roof replacement quote if the damage points toward a full re-roof rather than a patch.
Every visit starts with a free inspection and an itemized, no-obligation estimate, so you know the full scope before deciding anything. If your roof shows any of the signs covered above, get in touch with our team and we’ll walk it with you.
Sources
FAQ
How to tell if a roof is damaged by wind?
Look for lifted, curled, or missing shingles, bare spots where granules have worn away, bent or missing flashing and ridge caps, and any ceiling stains that appeared after a storm. A diagonal pattern of missing tabs across a slope often points to wind-related unsealing rather than isolated impact damage, per shingle performance research.
Will insurance pay for wind damage to roof?
Most homeowner policies cover sudden wind damage, though coverage details, deductibles, and documentation requirements vary by policy and insurer. Photographing the damage within a day or two of the storm and keeping any physical samples or receipts strengthens a claim regardless of which insurer you use.
How to inspect a roof for wind damage?
Start with a ground-level walkthrough using binoculars to check the roofline, gutters, and downspouts for granules or debris. If it’s safe, check the attic for daylight, wet insulation, or water stains on the decking, and avoid climbing onto wet, steep, or visibly damaged roofs; call a professional instead.
What does wind damage look like on a shingle?
Wind-damaged shingles often show curling or lifted edges, torn corners, or a diagonal pattern of missing tabs running up the roof slope. Bare, shiny patches where granules have worn off and dark granule buildup in gutters are also common signs tied to wind stress rather than normal wear.
Recommended
- Homeowners: 24–72 Hour Wind Damage Roof Photo Checklist For Claims
- Storm Damage Roof: What To Do In The First 72 Hours
- What To Do About Hail Damage To Your Roof Right Now
- Inspect Siding Hail Damage Within 72 Hours To Protect Your Claim
This article was prepared with AI assistance for general information. For recommendations specific to your property, contact Crowley Exteriors. Call or text us at 314-839-3800.