

The fastest safe path to new siding is to request 2 to 3 written, itemized estimates from licensed, insured local contractors and compare them line by line before signing anything. We provide free inspections and no-obligation estimates for homeowners weighing that choice. Before you commit, verify each contractor’s license, insurance, and references, since those three checks catch most problems early.
TL;DR:
- A complete estimate names the siding model, labor, housewrap, flashing, trim, disposal, permits, dates, payment terms, and workmanship and material warranties.
- Compare the water barrier, flashing sequence, drainage gap, and fastener spacing across bids; ask contractors to explain how their plan prevents water intrusion.
- For homes built before 1978, confirm EPA certification and written lead containment and cleanup procedures; check local permit requirements before work begins.
- Keep the deposit reasonable, request lien waivers from subcontractors, and withhold final payment until a completed walkthrough confirms cleanup and workmanship.
- The Department of Energy identifies siding replacement as the most cost effective time to add continuous exterior insulation while walls are exposed.
Table of Contents
- What a reputable siding installer includes in an estimate
- Siding materials and what they typically cost
- How to compare written estimates step-by-step
- Permits, lead safety, and code checks you need to know
- What to expect during the installation timeline
- Why a local, family-owned installer makes the hiring decision easier
- The real hiring problem isn’t finding a contractor, it’s comparing them fairly
- How to get started with Crowley Exteriors
- FAQ
- Sources
What a reputable siding installer includes in an estimate
A trustworthy bid reads like a project plan, not a price tag. It names the siding make and model, labor costs, fasteners, the water-resistive barrier (WRB) or housewrap, flashing, trim, disposal fees, permit handling, a start and completion date, a payment schedule, and warranty terms.
- Confirm the contractor’s license number, general liability insurance, and workers’ compensation coverage before any work begins.
- Ask for references from jobs completed in the last year and request recent photos of similar siding projects.
- Watch for red flags: door-to-door pressure, requests for large cash payments, blank contracts, or claims of “leftover materials” from another job.
- Get 2 to 3 written estimates, since a wide price gap usually means a missing line item, not a bargain.
The FTC’s guidance on avoiding home improvement scams recommends a written contract that spells out the work, materials, completion date, and license number, and it warns against paying the full balance upfront. Our siding replacement estimates follow that same itemized format so you can compare line by line. For a broader vetting routine, see our guide to choosing a roofer, which applies just as well to siding contractors.
Pro Tip: Ask each contractor to walk you through their estimate line by line in person. How clearly they explain it tells you almost as much as the number at the bottom.
Siding materials and what they typically cost
Vinyl, fiber cement, stucco, and engineered wood each suit different homes and budgets, and knowing their basic tradeoffs helps you read a bid intelligently.
- Vinyl siding is affordable, low-maintenance, and widely available, making it a common choice for straightforward re-siding jobs.
- Fiber cement resists fire, rot, and insects better than vinyl and holds paint longer, though installation takes more labor.
- Stucco suits dry climates and masonry-style homes but requires specialized crews and careful moisture detailing.
- Engineered wood offers a natural look with better impact resistance than traditional wood, provided it’s properly sealed.
- PVC trim pairs well with any of the above for fascia and corner boards that resist moisture and don’t rot.
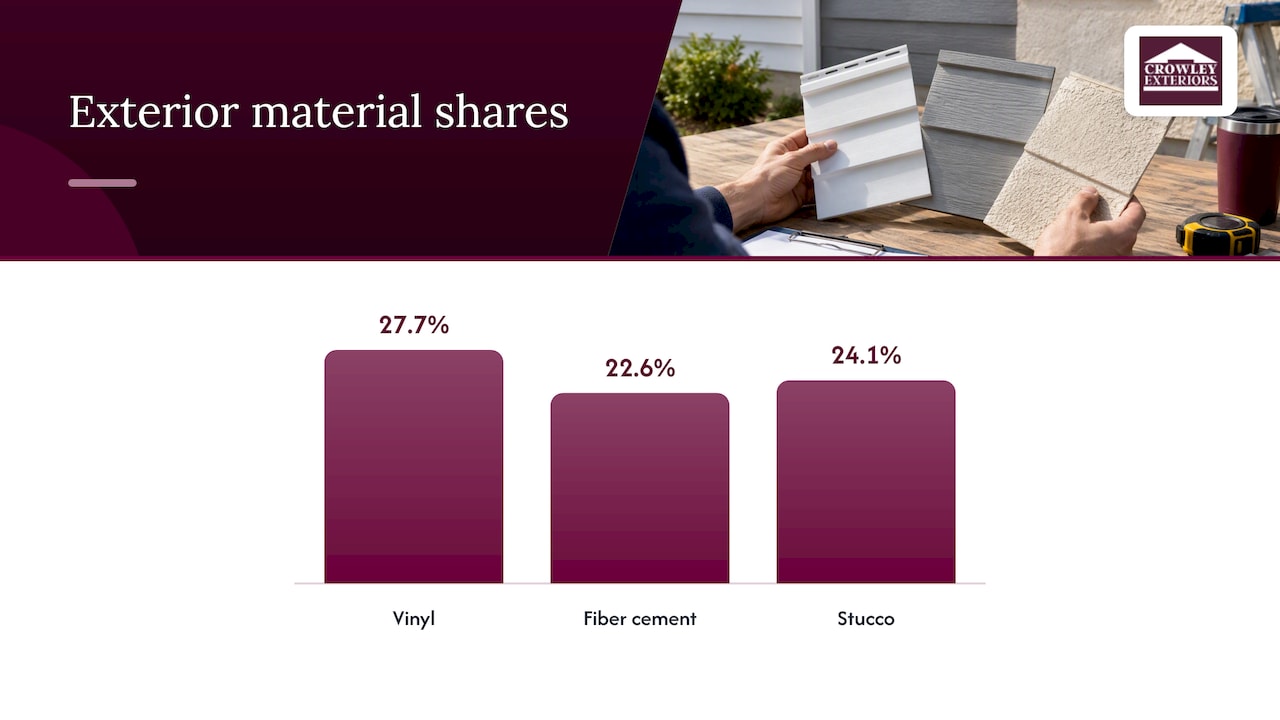
Vinyl remains the most common exterior wall material in new U.S. homes, used on 27.7% of homes started in 2025, according to NAHB’s exterior materials data, with fiber cement at 22.6% and stucco at 24.1%. That popularity keeps vinyl widely stocked and often the most competitively priced option, though your final cost depends on your home’s size, trim complexity, and regional labor rates.
When you re-side, it’s also a practical point to add continuous exterior insulation. The Department of Energy notes that siding replacement is often the most cost-effective time to improve wall insulation, since the wall is already exposed. Our breakdown of insulated vinyl siding costs covers what that upgrade adds to a typical bid.
How to compare written estimates step-by-step
Comparing bids by total price alone hides the details that matter most. Work through each estimate the same way.
- Line up materials side by side: same siding brand and profile, or a documented reason for the difference.
- Compare labor scope: does it include tear-off, disposal, and trim work, or are those billed separately?
- Check the WRB and flashing plan: which product, how the laps are sequenced, and whether a drainage gap is included.
- Confirm fastener type and spacing, and whether fasteners penetrate framing studs as the manufacturer requires.
- Review the payment schedule, deposit amount, and what triggers the final payment.
- Read the change-order language: how unexpected issues, like rotted sheathing, get documented and priced.
- Compare warranty length and what it covers: workmanship, materials, or both.
Ask installers directly how they handle WRB laps and flashing integration, since moisture-management guidance from the Building America Solution Center points to the WRB as the primary defense against water intrusion behind siding. Our house wrap checklist lists the specific questions worth asking here.
On payment terms, cap the deposit at a reasonable percentage, request lien waivers from subcontractors, and hold back final payment until after a completed walkthrough.
Pro Tip: If two bids differ by more than a small margin, ask both contractors to itemize their WRB, flashing, and fastener specs. That’s usually where the gap hides.
Permits, lead safety, and code checks you need to know
Most municipalities require a permit for full siding replacement, and your building department can confirm the requirement and any inspection steps before work starts.
- If your home was built before 1978, ask whether the crew is EPA-certified under the Renovate, Repair and Painting (RRP) Rule, since disturbing old paint triggers lead-safe work requirements.
- Request a written description of containment and cleanup procedures for lead-safe work, not just a verbal assurance.
- Confirm the contractor’s state or county license directly with the issuing agency rather than relying on a business card.
The EPA’s Renovate Right brochure outlines what a certified renovator must do, including specific containment and cleaning steps, and that setup time can affect the overall bid and schedule for older homes.
What to expect during the installation timeline
A typical single-family re-side moves through predictable phases, though exact timing depends on home size and weather.
- Inspection and estimate: usually completed within a few days of your first call.
- Material ordering and permit approval: can take one to a few weeks depending on your municipality and product lead times.
- Tear-off and WRB installation: often one to two days for an average home.
- Siding, trim, and flashing installation: typically two to five days depending on complexity.
- Final walkthrough and cleanup: a half day, including a check of fastener lines, caulking, and site debris removal.
Weather delays, permitting backlogs, and concealed rot discovered during tear-off are the most common causes of schedule slips. A reputable contractor documents any surprise with a written change order before proceeding, rather than adding cost after the fact. At the final walkthrough, check for straight reveal lines, sealed penetrations, and a clean yard before signing off.
Why a local, family-owned installer makes the hiring decision easier
We have extensive experience working on siding, roofing, and gutter projects in the St. Charles County area, which means our estimators understand the wind, moisture, and temperature swings that Missouri siding has to handle. That local experience shapes how we scope a job, from fastener spacing to flashing details around older trim.
- We provide free home inspections and no-obligation written estimates, with no pressure to sign on the spot.
- Our siding work is backed by a workmanship guarantee, detailed in writing alongside the manufacturer’s material warranty.
- Every estimate itemizes materials, labor, disposal, and permit handling, so you can compare it against any other bid using the same checklist above.
At your inspection, ask us directly about our permit-handling plan and warranty terms in writing. You can review our siding installation and replacement services or see how we explain insulation upgrades in our post on insulated siding benefits before we visit your home.
The real hiring problem isn’t finding a contractor, it’s comparing them fairly
Most homeowners don’t struggle to find someone willing to install siding. They struggle to tell a careful bid from a careless one, because the numbers on two estimates can look nearly identical while the scope underneath them is completely different. The conventional advice to “get three quotes” is true but incomplete: three quotes only help if you know what to compare line by line.
What gets overlooked most often is the WRB and flashing detail, the part of the job nobody sees once the siding goes up, and exactly the part most likely to cause a leak five years later. A low bid that skips a drainage gap or uses the wrong fastener spacing isn’t a deal, it’s a future repair. If you prioritize one thing before signing anything, make it this: ask every contractor to explain their moisture-management plan out loud. The ones who can’t, or who seem annoyed by the question, have told you what you need to know.
— Mario
How to get started with Crowley Exteriors
Getting a free inspection takes three steps: request your inspection, receive an itemized written estimate, and schedule your work on a timeline that fits your calendar. There’s no obligation to sign, and local scheduling and follow-up questions are addressed promptly.
Before your inspection, have a few things ready: photos of any problem areas on your siding, notes on past repairs or storm events, and copies of any recent inspection reports if you have them. That lets us give you a more precise estimate on the first visit.
Start with our siding replacement page to see our full process, or reach out through our services page to book your free, no-obligation estimate today.
FAQ
What’s the going rate per square foot for siding?
Siding costs vary widely by material, home size, and region, so homeowners should expect a range rather than a single number. Getting 2 to 3 written, itemized estimates from local contractors is the most reliable way to see what your specific project will cost.
What are people who fix roofs called?
Professionals who repair or replace roofing are generally called roofing contractors or roofers, and many of the same companies that handle roofing also install siding and gutters. Checking that a contractor is licensed and insured matters more than the job title on their business card.
What are the disadvantages of vinyl siding?
Vinyl siding can crack in extreme cold and may fade over time with prolonged sun exposure, and it offers less impact resistance than fiber cement. It remains one of the most widely used exterior materials in new homes because of its low cost and low maintenance, according to NAHB’s exterior materials data.
What is the new trend for siding?
Many homeowners are now pairing standard siding replacement with continuous exterior insulation, since the Department of Energy notes that re-siding is one of the most practical times to add it. Ask your contractor whether an insulated siding option fits your project and budget.
How do I verify a contractor’s license before hiring them?
Contact your state or county licensing board directly rather than relying on the contractor’s own claim, and ask for proof of general liability and workers’ compensation insurance in writing. The FTC’s scam-avoidance guidance recommends this step before signing any home improvement contract.
Sources
- 2025 exterior materials (NAHB blog)
- How to avoid a home improvement scam (FTC)
- Renovate Right brochure (EPA)
- Energy-efficient home improvement credit: insulation and air-sealing essentials (DOE)
Recommended
This article was prepared with AI assistance for general information. For recommendations specific to your property, contact Crowley Exteriors. Call or text us at 314-839-3800.