


Yes, drip edge is required on shingle roofs almost everywhere the International Residential Code applies. IRC R905.2.8.5 mandates it at both eaves and rakes, with metal extending at least 2 inches onto the roof deck and dropping at least 1/4 inch below the sheathing edge. Adjacent pieces need a minimum 2-inch overlap, and manufacturer instructions can push those numbers higher.
TL;DR:
- Proper drip edge should extend at least 2 inches onto the roof deck and drop 1/4 inch below the sheathing to ensure proper water runoff.
- Installation sequencing requires drip edge at the eave to be placed on the deck first, then underlayment, while at the rake underlayment goes down first, then the drip edge.
- Fastening should be every 8 to 10 inches on the flange, with sections overlapping by at least 2 inches, and the metal typically should be 26-gauge galvanized steel.
- Use the manufacturer’s instructions to exceed code minimums where applicable, especially regarding nail spacing and starter shingle overhang.
- Signs of poor installation include visible gaps, rust, lifted shingles, or water stains, and correction should be done by a licensed professional to prevent further damage.
Table of Contents
- What Drip Edge Requirements Actually Say
- Eaves, Rakes, and Starter Shingle Placement
- Choosing the Right Drip Edge Material and Profile
- Installing Drip Edge: Sequence and Fastening Specs
- Manufacturer Specs Can Override Code Minimums
- Signs of Bad Drip Edge and When to Call Someone
- Adjusting for Wind and Ice-Dam Climates
- What Our Inspections Look For Beyond Code Minimums
- Get a Free Roof Inspection From Crowley Exteriors
- Sources
What Drip Edge Requirements Actually Say
The code language is short, but every phrase carries weight. R905.2.8.5 requires corrosion-resistant metal flashing at eaves and rake edges of asphalt shingle roofs, with a minimum 2-inch overlap where two pieces meet along a run. The flashing has to extend back onto the roof deck at least 2 inches and hang down at least 1/4 inch below the sheathing so water drips clear of the fascia instead of running behind it.
The Asphalt Roofing Manufacturers Association backs the same dimensions and adds field-tested fastening advice: nail spacing recommended closer together than the code’s maximum spacing to improve fastening strength. ARMA also specifies the sequence, drip edge underlayment at eaves, over it at rakes, which trips up more installers than the dimensions do.
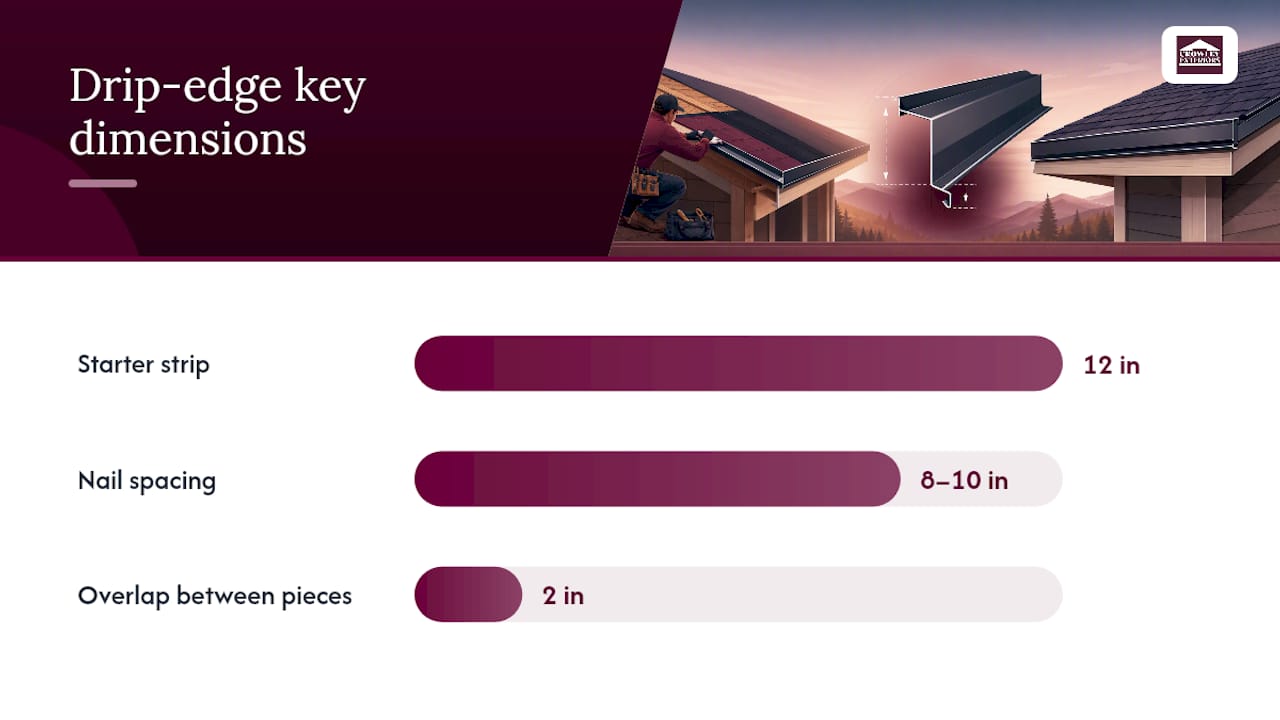
- Extend 2 inches minimum onto the roof deck
- Drop at least 1/4 inch below the sheathing
- Overlap adjoining sections by 2 inches minimum
- Fasten every 8 to 10 inches for a tighter hold than code’s 12-inch cap
Minimum metal thickness matters too. Most codes and manufacturer specs reference 26-gauge galvanized steel (about 0.019 inch) as a baseline, thin enough to form easily but thick enough to resist denting from ladders and debris.
Eaves, Rakes, and Starter Shingle Placement
Placement trips up more roofs than the metal gauge ever does. Underlayment sequencing at eaves and rakes runs in opposite directions, and getting it backwards defeats the whole point of the flashing.
- At the eave, install drip edge directly on the deck first, then run underlayment over top of it (with the exception of some self-adhering ice-and-water products applied per manufacturer instructions).
- At the rake, reverse the order: underlayment goes down first, then drip edge covers it.
- Starter shingles should overhang the drip edge by about 1/4 to 3/4 inch, depending on the profile, enough to shed water past the metal without leaving a gap for wind to catch.
- Overlap sections by at least 2 inches, always shingled in the direction water flows, so each lap sheds downhill instead of catching runoff.
Skipping the eave-under, rake-over rule is one of the most common callback-generating mistakes in residential roofing.
Choosing the Right Drip Edge Material and Profile
Material choice depends on climate exposure and budget more than aesthetics. Aluminum resists corrosion well and costs less than copper, making it the most common choice for standard residential work. Galvanized steel is stronger and cheaper but can rust at cut edges or scratches over time if the coating wears through. Copper outlasts both but at a price point most homeowners reserve for high-end or historic projects.
Profile shape matters as much as metal type:
- L-type (Type C) is the simplest bend, a single angle, common on rake edges and budget installs
- T-type (Type D) adds a hemmed edge for extra rigidity and a cleaner drip line, favored at eaves
- Gutter-apron (Type F) extends further and tucks behind gutters, useful where fascia boards sit slightly recessed
Wider roof legs and heavier gauge metal earn their upcharge in high-wind zones or on roofs with wide overhangs, where standard profiles can flex or lift.
Installing Drip Edge: Sequence and Fastening Specs
Get the sequence right and the fastening details follow naturally. At the eave, drip edge goes on bare decking first. If you’re layering in a self-adhering ice-and-water membrane, ARMA’s technique calls for a 12-inch starter strip of that membrane applied first, aligned to where the drip edge’s lower edge will sit, then the drip edge over that strip, then the full underlayment run overlapping the drip edge from above. That sandwich gives you two layers of protection at the most leak-prone edge of the roof.
- Install eave drip edge on bare deck (or over the starter ice-and-water strip)
- Run full underlayment over the eave drip edge, overlapping per manufacturer spec
- Install rake drip edge over the underlayment along both roof edges
- Fasten with roofing nails placed on the horizontal flange only, never through the vertical face, at 8 to 10 inches on center in typical conditions
- Overlap adjoining drip edge pieces by 2 inches minimum, shingled downhill
- Set starter shingles with the correct overhang, then begin standard shingle courses
Pro Tip: Walk the eave line before the underlayment goes down and check that every nail sits on the flat flange, not the vertical lip. A nail through the vertical face creates a pinhole leak path that won’t show up until the fascia’s already rotting.
Once the roof is dried in, a quick visual pass tells you most of what you need to know: consistent nail line, no visible gaps between segments, no daylight showing under the metal, and no bare or rusted spots where galvanizing has worn through.
Manufacturer Specs Can Override Code Minimums
Code sets the floor, not the ceiling. Shingle manufacturers frequently require tighter nail spacing or specific starter-course overhangs as a condition of their warranty coverage, and GAF’s own guidance is explicit that following their installation instructions is part of staying warranty-eligible.
- Always follow the stricter of code minimums or manufacturer instructions, never the looser one
- Ask your contractor to note on the invoice which manufacturer spec sheet was used
- Keep the shingle wrapper or product data sheet with your paperwork; it documents the warranty terms an inspector or insurance adjuster may ask for later
Signs of Bad Drip Edge and When to Call Someone
A misinstalled drip edge doesn’t announce itself right away. Surface tension lets water creep sideways and wick back underneath shingles long before you see a drip inside the house, and by the time it shows up on your ceiling or in a roof valley, the decking underneath has often been wet for months.
- Water stains streaking down the fascia board below the roofline
- Starter shingles lifting or curling at the edge
- Visible gaps between the drip edge and the deck when viewed from a ladder
- Rust spots or flaking galvanizing on the metal itself
- Nail spacing that looks wider than a hand’s width apart
A homeowner can often spot these issues from the ground with binoculars or a quick ladder check. Actual correction, pulling shingles, resetting metal, refastening, is a job for a licensed roofing professional, since disturbing the edge without resealing it properly creates a bigger problem than the one you started with.
Adjusting for Wind and Ice-Dam Climates
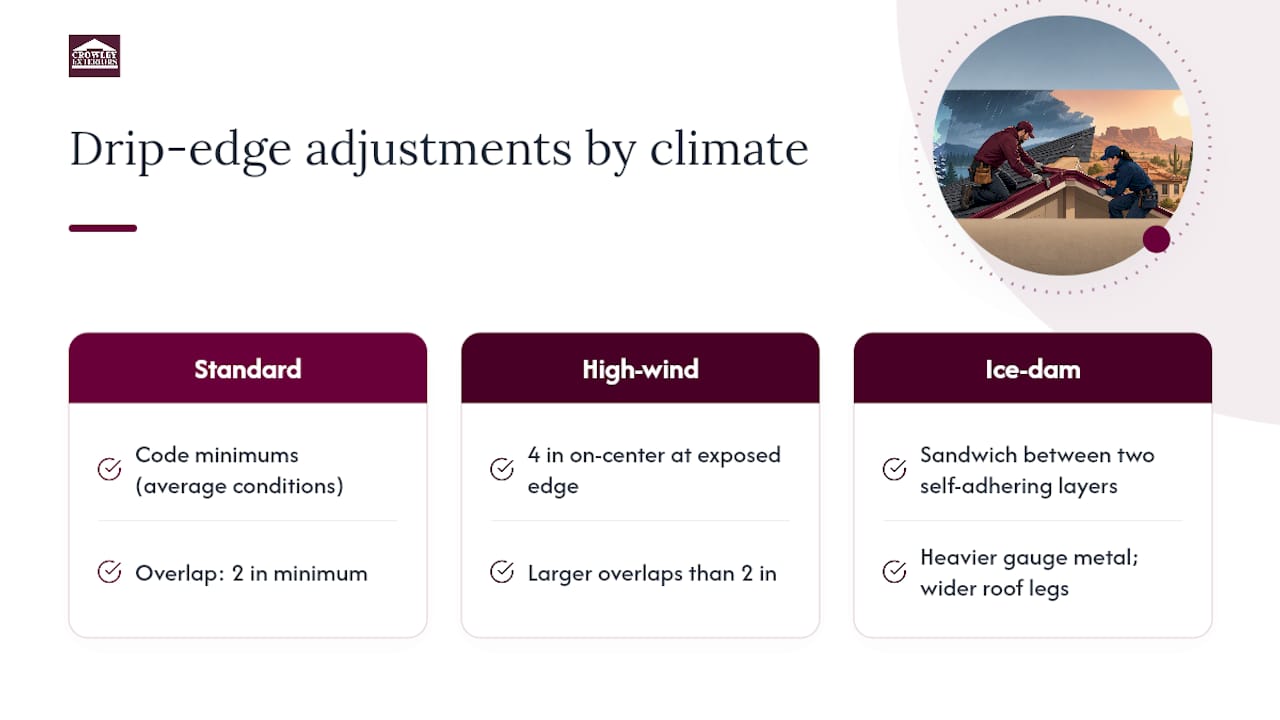
Code minimums assume average conditions, and plenty of roofs sit outside that average. In high-wind regions, Fortified Home guidance pushes installers toward tighter nail spacing, sometimes down to 4 inches on center at exposed edges, and larger overlaps than the 2-inch code minimum to resist uplift. For ice-dam-prone climates, sandwiching the drip edge between two layers of self-adhering underlayment at the eave adds a second line of defense if meltwater backs up under the shingles. Heavier gauge metal and wider roof legs are worth the upcharge anywhere gutters ice over regularly.
What Our Inspections Look For Beyond Code Minimums
When Crowley Exteriors runs a free inspection, we check drip edge against both code and manufacturer spec, not just one or the other. We photograph nail lines, overlaps, and fascia condition before and after work, and our invoices note the exact material and profile installed, details that matter if you ever file a warranty claim. On a 25 year old roof, the small placement details are usually where the real story is.
— Mario
Get a Free Roof Inspection From Crowley Exteriors
If you’re not sure whether your drip edge meets code or your shingle manufacturer’s warranty terms, a ladder and a flashlight only get you so far. Crowley Exteriors offers free inspections across St. Charles County with no obligation attached, and every roofing job carries a 25 year guarantee that covers workmanship, not just materials.

We check drip edge placement, fastening pattern, and overlap against both IRC minimums and the shingle manufacturer’s own installation requirements, then hand you a straightforward estimate with no pressure to sign anything on the spot. If you’re planning ahead, our roof estimate checklist shows exactly what a thorough inspection should cover before you commit to any contractor. Request your free inspection through Crowley Exteriors today and find out whether your roof edge is actually protecting your home the way it should.