

Starter strip shingles are the first course of asphalt shingles along the eaves and rakes of your roof, and they sit hidden under the first visible row. Their factory-applied adhesive bonds to the shingle above, which reduces the chance of wind damage and water infiltration. You never see them once the roof is done. They still decide whether the edges of your roof stay sealed through a Missouri storm.
This guide explains what starter strips are, where they go, whether you can substitute regular shingles, how installation works, and what to look for on a roofing estimate.
TL;DR
- Starter strips are installed at the eaves and rakes, under the first visible course. Their adhesive seals the edge shingles down against wind and water.
- Building America, a U.S. Department of Energy resource, directs installers to use them at both the eaves and the rakes. The manufacturer’s instructions for your shingle also apply.
- Cut-up 3-tab or architectural shingles are a poor stand-in. Purpose-made starters have the sealant in the right place and match the shingle line they are made for.
- Compatibility is checked by product line. Some manufacturers require their own starter for certain shingles or for the upgraded warranty.
- Ask your roofer to list the starter product by name on the estimate.
Table of Contents
- What starter strip shingles are and what they do
- Where starter strips go on the roof
- Do you need a starter strip?
- Can you use regular shingles as a starter?
- Types of starter strips and how to match them
- How starter strips are installed
- Starter strips and wind
- What to look for on your roofing estimate
- Our perspective
- Get your roof’s edges done right
- FAQ
- Sources
What starter strip shingles are and what they do
A starter strip is a narrow, pre-cut strip of asphalt shingle material with a line of sealant on one edge. It is installed at the eaves and rakes beneath the next shingle course. The Building America Solution Center explains that the adhesive bonds to the shingle above, sealing the two together. That is the reason it exists.
It does two jobs at once:
- Covers the gaps. A normal shingle has cutouts and joints. IKO notes that starters cover the joints and cutouts in the first eave course, so water that gets past the first visible row has no direct path to the deck.
- Anchors the edge. The sealant bonds the first field course, which helps it resist wind uplift at the eaves and rakes. Those are the places wind grabs a roof first.
If you have searched “what are starter shingles,” that is the short answer: a hidden first row whose sealant holds the visible shingles down along the edges.
Where starter strips go on the roof
Starters belong along every lower eave and along the sloping rake (gable) edges. They go on after the edge protection and underlayment, and under the first visible course of shingles. Our guide to roof underlayment types and eave requirements covers what goes down before the starter, and our drip edge checklist covers the metal at the roof’s edge.
The sealant placement depends on the edge:
- At the eave, the sealant faces up and toward the eave edge.
- At the rake, the sealant faces toward the outer rake edge.
- At the corner, the rake starter overlaps the eave starter by 3 inches.
IKO explains that the two edges serve different purposes. At the eave, the starter helps shed water. At the rake, its sealant improves wind resistance, and its straight edge helps keep the courses aligned.
How far the starter overhangs
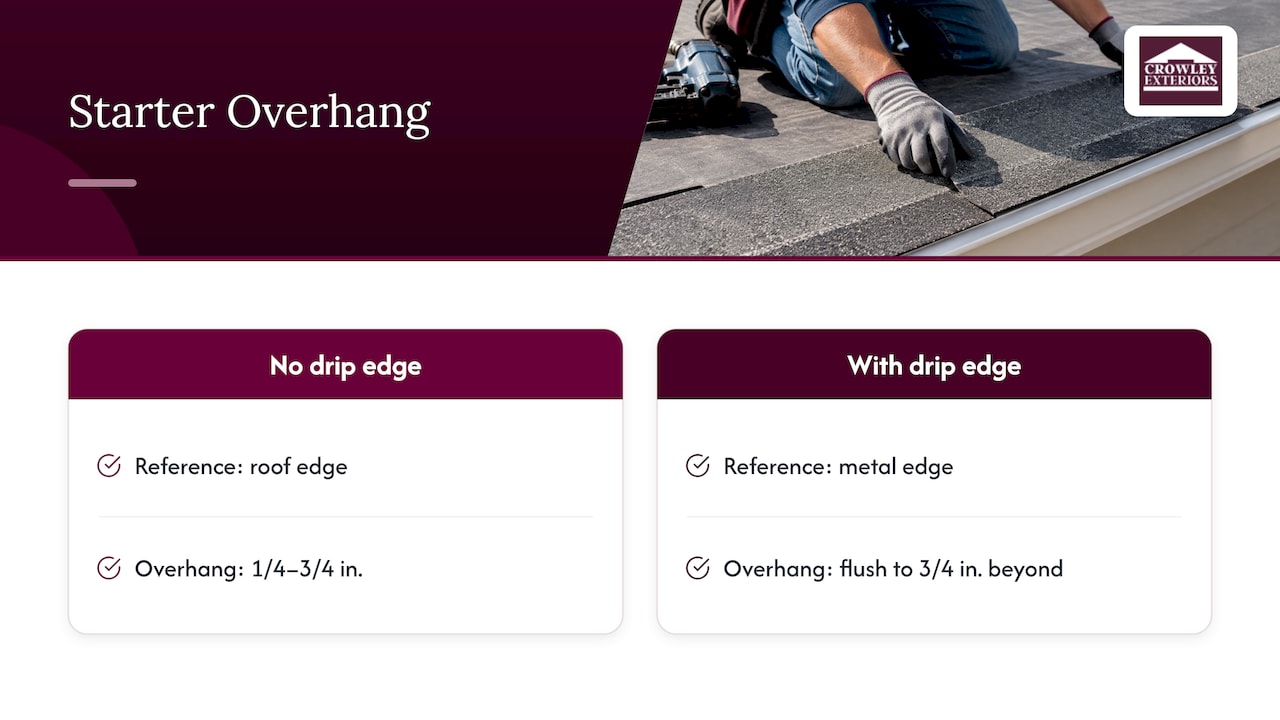
Building America and IKO both give an overhang of 1/4 to 3/4 inch past the roof edge. TAMKO’s instructions add detail for drip edge. With no drip edge, the starter overhangs 1/4 to 3/4 inch. With a drip edge, it can be flush with the metal or overhang it by up to 3/4 inch.
Do you need a starter strip?
Yes, in practice. Building America directs installers to use starter strips at the eaves and rakes. Local code and the shingle manufacturer’s instructions also apply, and the manufacturer’s instructions often decide whether your warranty is honored. A roof without a proper starter course leaves the first row relying on nails alone, with unsealed cutouts underneath.
The starter also matters to your coverage. CertainTeed states that installing its SwiftStart at the eaves and rakes can qualify Landmark shingles for an upgraded 130-mph wind warranty. Our overview of roof warranty coverage explains how material and workmanship coverage fit together.
Can you use regular shingles as a starter?
This is the question behind most searches on the topic, and the answer is that a purpose-made starter is the better choice. Here is what the sources say.
- GAF says cutting 3-tab shingles for starters risks improperly placed adhesive. Its factory-made starters have precisely positioned adhesive and a uniform size.
- Under the International Residential Code, which St. Charles County and most local cities adopt with local amendments (Section R905), roof coverings must be installed according to the manufacturer’s instructions. Shingle manufacturers call for a true starter strip at the rakes and eaves rather than a cut 3-tab substitute.
- Fine Homebuilding notes that a trimmed 3-tab can serve along the eave, but that turning one upside down puts its seal strip too high to help.
- Architectural shingles are thicker and uneven when cut, and they do not produce a flat, straight first row. Cutting them also wastes a more expensive product.
A factory starter solves all of this. It arrives sized, with sealant where it needs to be, and it saves labor on the roof. GAF describes its Pro-Start as an alternative to cutting 3-tab shingles, compatible with most GAF shingle lines, with factory-applied adhesive to help prevent blow-off.
What about the rakes?
Fine Homebuilding says rake starters are not imperative, but it still recommends them. They stiffen overhanging edges and give a cleaner sightline. Building America and IKO both call for starters at rakes too. On a roof that has to survive Missouri wind, we install them at both edges.
Types of starter strips and how to match them
Starter strips are not interchangeable across every shingle. Manufacturers design them in tandem with particular field-shingle styles, and CertainTeed’s accessory catalog says compatibility must be checked by product line rather than judged by appearance.
| Starter | Made for | Key detail |
|---|---|---|
| Owens Corning Starter Strip Plus | Most Owens Corning shingles with exposure up to 6 inches | Separates into two pieces, each 7-3/4 by 39-3/8 inches. A bundle covers about 105 lineal feet. Not for Woodcrest or Woodmoor, which need WoodStart. |
| GAF Pro-Start | Most GAF lines, including 3-tab and architectural | Factory-applied adhesive. Separates into two strips. |
| CertainTeed SwiftStart | Landmark and similar metric shingles | Meets a 2-inch minimum headlap. Required for certain enhanced warranties. |
| CertainTeed High Performance Starter | Belmont, Grand Manor, Highland Slate | Listed in the accessory catalog for these lines. |
| CertainTeed Presidential Starter | Presidential Shake products | Required for those products. |
| IKO Leading Edge Plus | IKO shingles | Granule side up, factory sealant next to the roof edge. |
Sources for the table: Owens Corning’s instructions for Starter Strip Plus, the GAF and CertainTeed product pages linked above, and IKO’s Leading Edge Plus instructions.
The practical rule: the starter normally comes from the same manufacturer as the shingle. Owens Corning also notes that Starter Strip Plus works with shingle exposure up to 6 inches, and that larger exposures need a full starter. That is a good reason to confirm the match before the crew loads the roof.
How starter strips are installed
Installation details vary a little between manufacturers, so the product’s own instructions win. The common pattern, drawn from Building America and the manufacturers’ published instructions, looks like this.
- Prepare the edge. Drip edge and underlayment go down first, so the starter lands on a clean, dry, flat surface.
- Separate the strip. Building America says starters are normally packaged as two pieces per shingle, separated at the middle. The self-adhesive strip faces up and toward the eave edge, or toward the rake edge at a rake.
- Start the first piece correctly. Owens Corning has the installer remove 6 inches from the first starter at the rake, set it flush with the drip edge, and keep it no more than 3/4 inch beyond the eave. GAF’s Pro-Start instructions begin 1 to 2 inches from the rake and remove 3 inches from the first piece when the field shingles are 39-3/8 inches. A full strip is used with 36-inch shingles.
- Nail in the right band. Building America puts eave starter nails 2 to 3 inches from the bottom. TAMKO uses 1-1/2 to 3 inches. GAF specifies 1-1/2 to 3 inches above the eave, with nails every 10 to 12 inches. Owens Corning calls for five fasteners 2 to 3 inches from the eave edge. IKO’s standard is 3 to 4 inches from the bottom edge, with four nails per strip.
- Run the rake starters. They overlap the eave starters by 3 inches at the lower corner, with the sealant toward the outer edge.
- Offset the joints. Owens Corning requires end joints of the overlying shingles to sit at least 4 inches from the starter’s end joints. With 3-tab shingles, starter nails must not show through the cutouts of the course above.
- Install the first course. The first visible course goes on per the manufacturer’s instructions, pressing into the starter sealant.
The ranges differ by product on purpose. That is why a crew that works from the label on your bundle, and not from habit, matters.
Starter strips and wind
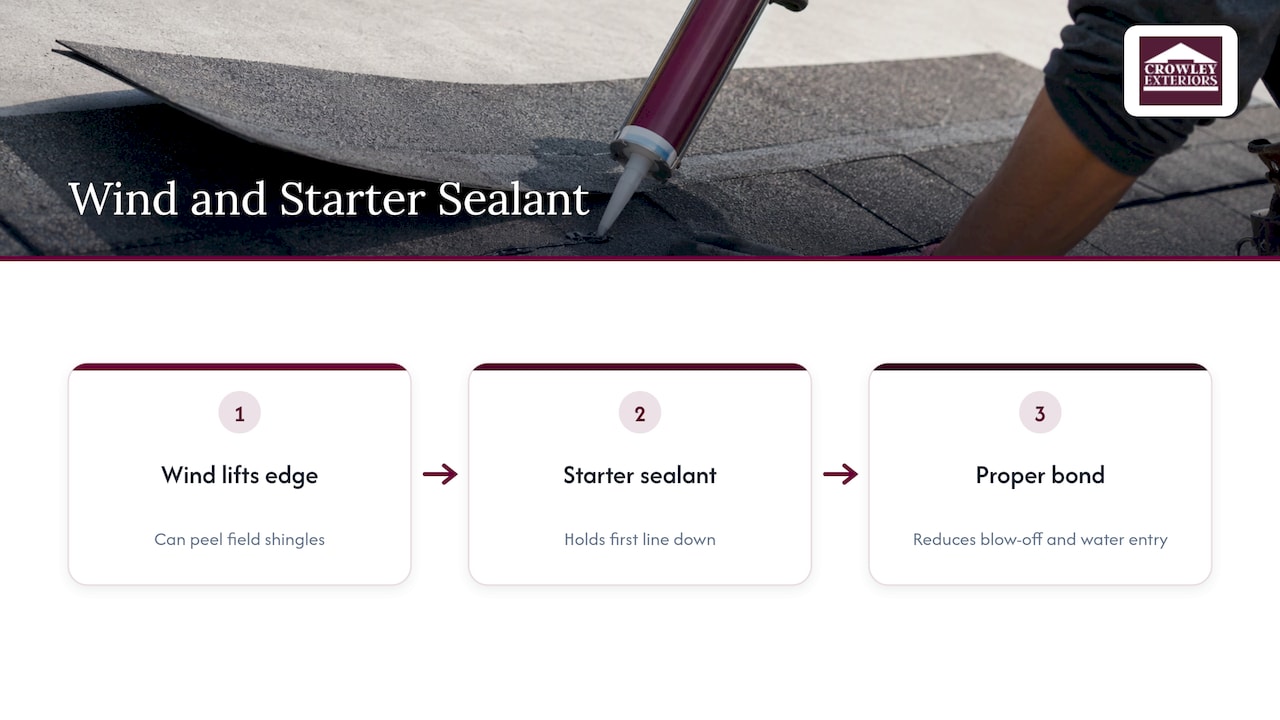
The first row is the most exposed. Wind that lifts an edge shingle can peel a field of them, and the starter’s sealant is what holds that first line down. When the adhesive bonds properly, it reduces the risk of blow-off and water entering under the edge. Cold weather can slow sealing, so a roof installed late in the year relies on the sealant activating as temperatures rise. If your shingles have lifted or curled at the edges, our guide to curling roof shingles explains the causes and when repair or replacement makes sense.
Edge details work as a system. The drip edge, underlayment, starter and flashing each carry part of the load, and our rundown of roof flashing types shows how the rest of the perimeter fits together.
What to look for on your roofing estimate
Starter strips are a small line item, but how an estimate treats them says a lot about the job. When you compare bids, look for:
- The starter product named, from the same line as the shingle.
- Starters at both eaves and rakes.
- Drip edge and underlayment listed separately.
- The manufacturer’s warranty requirements, including any required starter, acknowledged.
Starter strips are usually a modest share of material cost compared with the shingles themselves, so there is little reason to settle for improvised substitutes. Our roof estimate checklist lists what a complete bid should include, and the 12-line estimate breakdown shows an example.
If you are replacing a roof partly because you plan to sell, a roof replacement before selling analysis can help you weigh the cost against what a new roof does for the sale. For how a replacement unfolds day to day, see our roof replacement process page.
Our perspective
We have spent more than 20 years on roofs in St. Charles County, and the starter course is where we see the difference between a roof that is built to last and one that is built to finish.
Nobody sees the starter once the shingles are on. That is exactly why we do not improvise it. We use a manufactured starter matched to the shingle line, on the eaves and the rakes, and we nail it where the manufacturer says to nail it. Missouri brings hard wind, hail and swings in temperature, and the edges take the first hit.
It is also why we put our estimates in writing and itemize them. You should be able to see what goes under your shingles, not just on top of them. Our free inspection and no-obligation estimate are built around that kind of transparency, and our workmanship warranty (10 years on full roof replacements, 1 year on most repairs) reflects how we want the work to hold up.
When a roof is done right at the edges, you stop thinking about it. That is the goal.
Mario
Get your roof’s edges done right
If your roof is aging, storm-hit or already showing lifted edge shingles, we can look at it for free. We are a family-owned roofer serving St. Charles County, and we provide free inspections and no-obligation, itemized estimates for roof replacement, repair, storm and hail damage, and insurance claim assistance. We will tell you which starter and shingle system we would install and why.
See everything we offer on our services page, or start at Crowley Exteriors to book your inspection.
FAQ
Do you need a starter strip for shingles?
Yes. Building America directs installers to use starter strips at the eaves and rakes, and manufacturers publish starter requirements for their shingles. Some warranties depend on using the right starter. Local code and the shingle manufacturer’s instructions apply on every job.
Where do you put starter strip shingles?
They go along the lower eaves and the sloping rake edges, under the first visible shingle course and over the underlayment and drip edge. The sealant faces the eave edge at the eaves and the outer edge at the rakes. They overhang the roof edge by 1/4 to 3/4 inch.
Can you use regular shingles as starter strips?
A trimmed 3-tab can work along an eave, but it is a workaround. Cut shingles can place adhesive in the wrong spot, and architectural shingles cut unevenly. A factory starter has the sealant positioned correctly and is made to match the shingle line, so it is the better choice.
What is an asphalt shingle starter strip?
It is a narrow, pre-cut strip of asphalt shingle material with factory sealant, installed at the roof’s edges beneath the first field course. Most are packaged as two pieces per shingle. The sealant bonds the first visible course down against wind and helps keep water out.
Do I need to choose the starter myself?
No. Your roofer should select a starter that matches your shingle line and name it on the estimate. Ask which product is going on your roof and whether it meets the manufacturer’s warranty requirements.
Sources
- Asphalt Shingle Roofs, Building America Solution Center
- The Purpose of Starter Shingles, IKO
- IKO Leading Edge Plus application instructions
- TAMKO Shingle Starter application instructions
- CertainTeed SwiftStart
- CertainTeed accessories product catalog
- GAF: What Is a Shingle Starter Strip
- GAF Pro-Start Starter Strip Shingles
- Owens Corning Starter Strip Plus application instructions
- Fine Homebuilding: The Starter Course
Recommended
- St. Charles Homeowners: Roof Replacement Process, 1–3 Day Timeline And Costs
- Homeowners: Which Roof Underlayment Needs ASTM D1970 At Eaves
- IRC Drip Edge: Contractor Verified Checklist For Homeowners & Pros
- Three Checks Homeowners Can Do In 10 Minutes To Choose A Roofer
This article was prepared with AI assistance for general information. For recommendations specific to your property, contact Crowley Exteriors. Call or text us at 314-839-3800.