


If you’re seeing water stains near your chimney, there’s a good chance a chimney flashing leak is the cause, especially if the stains follow rain or snowmelt rather than showing up randomly. That pattern points to a failed seal at the roofline, not a roof-wide problem. Stop using the fireplace if water is anywhere near the firebox, and skip the attic or roof inspection until the storm passes.
- Photograph every stain and wet spot now, before you touch anything
- Check the attic near the chimney chase for damp insulation or dark sheathing
- Listen for active dripping during rain and note the time
Pro Tip: Never inspect a wet or icy roof. If you can’t safely see the flashing from a ladder on dry ground, call a roofer instead of climbing up.
Key Takeaways
Correctly identifying which of the six flashing failure modes is causing a leak determines whether a repair lasts two years or twenty.
| Point | Details |
|---|---|
| Diagnose before you patch | Rule out crown, mortar, and cricket issues before assuming sealant alone is the problem. |
| Skip the tar shortcut | Caulk-only fixes trap moisture and often raise the eventual repair cost. |
| Match cost to scope | Expect roughly $400–$700 for a reseal versus $1,400 or more for a full reflash. |
| Document everything for insurance | Dated photos and a professional report separate sudden storm damage from denied maintenance claims. |
| Get a free diagnosis first | Crowleyexteriors offers free inspections with photo documentation before recommending any repair. |
Table of Contents
- What Chimney Flashing Actually Is and Why Each Part Matters
- What Are the Signs of a Chimney Flashing Leak?
- The Six Failure Modes Behind Most Flashing Leaks
- Fixing It: From a Quick Reseal to a Full Reflash
- How Much Does Chimney Flashing Repair Cost?
- Should You Fix Flashing Leaks Yourself or Hire a Pro?
- Will Insurance Cover a Chimney Flashing Leak?
- How Crowleyexteriors Diagnoses and Fixes Flashing Leaks
- Sources
What Chimney Flashing Actually Is and Why Each Part Matters
Chimney flashing isn’t one piece of metal. It’s an assembly, and a failure in any single piece can cause a leak.
- Apron flashing covers the front, low side of the chimney where it meets the roof.
- Step flashing interlocks with each shingle course along the sides, forming a staircase that channels water outward.
- Counter-flashing tucks into a reglet, a groove cut into the mortar, and laps over the step flashing to seal the top edge.
- Chimney crown is the concrete or mortar cap on top of the masonry that sheds water away from the flue.
- Cricket (or saddle) diverts water around the uphill side of wide chimneys.
Aluminum flashing typically lasts 10 to 15 years, galvanized steel closer to 20, and copper can outlast the roof itself. But even the best metal fails early if it’s set into crumbling mortar.
What Are the Signs of a Chimney Flashing Leak?
Start indoors, since interior clues are safer to gather and often more revealing than what you’ll see from the ground.
Interior and attic signs: ceiling stains near the chimney, peeling paint or damp plaster, puddling inside the firebox, and efflorescence (a white chalky residue) on interior brick. In the attic, look for damp insulation, dark staining on the sheathing at the chimney’s corners, and nail heads that look shiny or wet rather than dull. A careful check of the attic decking at all four chimney corners after heavy rain is one of the most reliable ways to confirm the leak’s location.
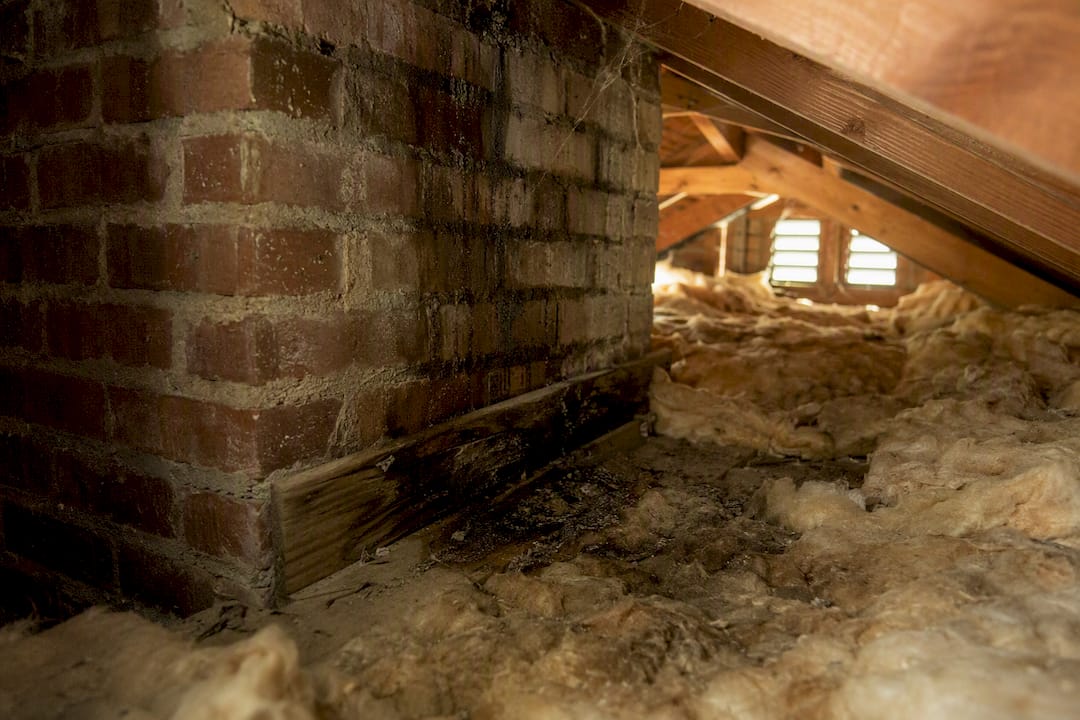
Exterior signs: lifted or rusted step flashing, visible gaps at the reglet line, missing flashing sections, a cracked crown, a missing cap, or no cricket at all on a chimney wider than about 30 inches.
Work from safest to riskiest: attic first, then binoculars from the ground, then a ladder only if you’re confident and the roof is dry. A hose test can help. Have someone inside while you run water low to high, holding a few minutes per section to mimic wind-driven rain. Skip it entirely if the roof pitch or wet conditions make ladder work unsafe.
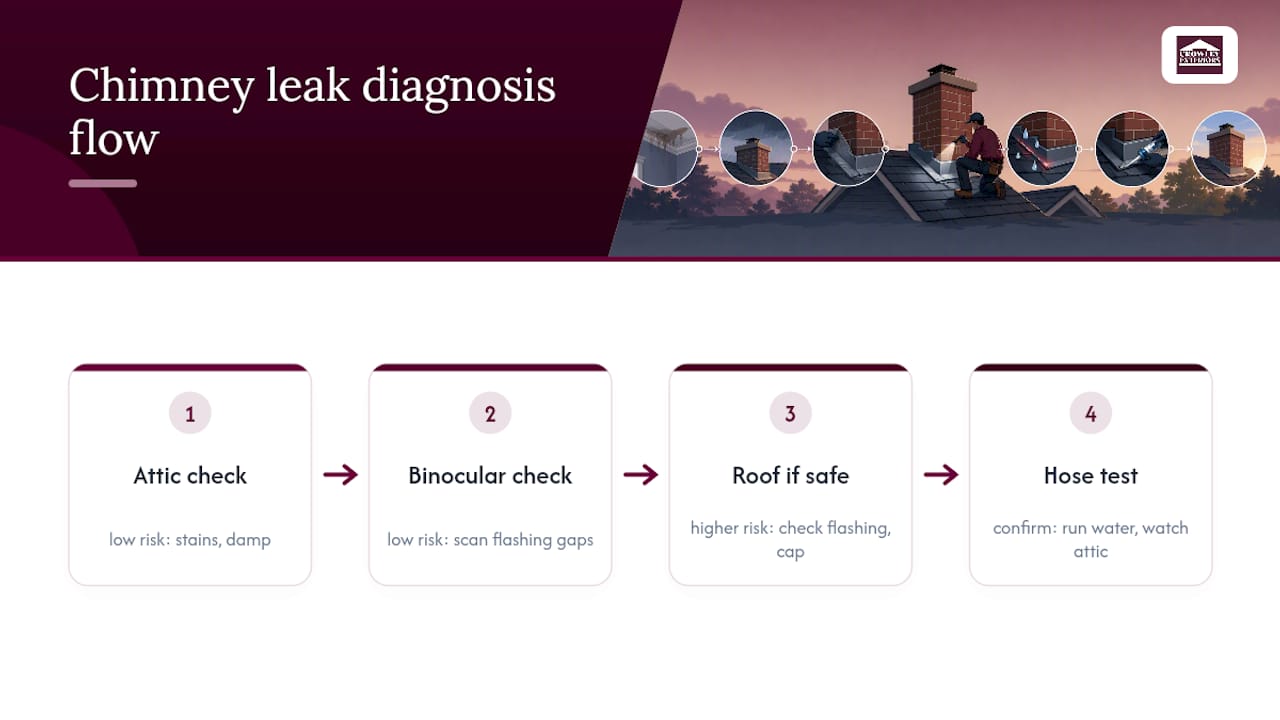
Pro Tip: A professional will often run a controlled hose test section by section while another tech watches the attic in real time. That kind of coordinated test is hard to replicate alone and is one reason DIY diagnosis often misses the actual leak point.
The Six Failure Modes Behind Most Flashing Leaks
Correct diagnosis is the difference between a fix that lasts and one you’ll redo next spring, and pinpointing the exact failure mode before repairing anything is the single biggest factor in avoiding repeat leaks.
- Dried sealant at the reglet — check for cracked or shrunken caulk; fix with a proper reseal.
- Cracked mortar or reglet joint — probe the mortar with a screwdriver; crumbling joints need repacking, not more caulk.
- Missing counter-flashing — visible from the ground; requires new counter-flashing set into a reglet.
- Separated or rusted step flashing — spot rust streaks or lifted metal; usually needs replacement, not patching.
- Cracked crown or missing cap — a mason, not a roofer, handles this once flashing is ruled out.
- Missing cricket on the uphill side of a wide chimney — confirmed by recurring leaks despite intact flashing.
Each mode points to a different repair class. Sealant failures often take a temporary reseal; mortar and cricket problems require a rebuild that lasts decades.
Fixing It: From a Quick Reseal to a Full Reflash
Not every leak needs a full teardown, but plenty get treated with the wrong fix.
- Reseal the reglet with polyurethane sealant: fastest and cheapest, but expect roughly 10 to 20 years of service life, shorter on horizontal joints exposed to sun and standing water.
- Re-bed counter-flashing into a fresh reglet: a step up from resealing, appropriate when the metal is sound but the mortar bed has failed.
- Replace step flashing and re-lay affected shingles: necessary when metal is rusted through or separated from the roof deck.
- Full reflash with a saw-cut reglet: grinding a clean groove into solid mortar and setting new counter-flashing is the most durable option, often lasting 25 to 40 years.
- Add a cricket: required by code on wide chimneys and the only real fix for recurring uphill leaks.
- Masonry crown repair or tuckpointing: addresses water entering through the chimney structure itself, separate from flashing.
Caulk-only repairs are the most common shortcut, and also the most common reason homeowners call back a year later. Trapped moisture under a bead of tar or caulk accelerates rust rather than stopping it, which is why a proper repair typically means removing old sealant and cleaning the surface before applying anything new.
How Much Does Chimney Flashing Repair Cost?
Price depends heavily on scope, chimney size, and material.
- Simple reseal or re-bed: roughly $400 to $700, sometimes as low as $200 for minor work
- Partial step flashing replacement: often falls in the $300 to $1,800 range depending on chimney size and roof access
- Full reflash: $325 to $1,400 installed for typical single-flue jobs, more for oversize or copper
- Adding a cricket: commonly $320 to $460 extra
- Crown repair or tuckpointing: billed separately as masonry work apart from flashing repairs
Labor drives most of the bill, so an itemized quote with photos matters more than the total dollar figure.
Pro Tip: If a contractor’s quote is dramatically below the range above, ask exactly what material and method they’re using. A cheap caulk-only fix now often costs more than a proper reflash would have.
Should You Fix Flashing Leaks Yourself or Hire a Pro?
A minor reseal on a single-story home with sound masonry is reasonable for a comfortable DIYer. Anything beyond that tips toward hiring out.
- Single story, solid mortar, small sealant gap: DIY reseal is a fair attempt.
- Multi-story, crumbling mortar, missing cricket, or visible rot: hire a professional.
- Any roof pitch or height that makes you hesitate on the ladder: hire a professional, full stop.
The risk isn’t just falling. First-time DIY reflashing jobs have a failure rate of roughly 40% in the first wet season, often from missed reverse-laps or wrong materials, and what takes a skilled roofer 4 to 6 hours can eat up 12 to 20 hours for a first attempt. Reviewing a gallery of properly completed flashing work helps you spot the difference between a clean job and a rushed one before you sign a contract.
When you do hire out, ask whether they’ll saw-cut a new reglet or just re-caulk the old one, what material they’re using, what warranty they offer in writing, and whether they coordinate with a mason if the crown needs work. Insist on dated before-and-after photos regardless of who does the job.
Will Insurance Cover a Chimney Flashing Leak?
Coverage almost always comes down to cause. Insurers typically pay for flashing damage caused by a sudden event like wind, hail, or a fallen branch, but they routinely deny claims tied to rust, dried sealant, or age-related mortar failure.
- Photograph the flashing before and after any storm, with dates.
- Keep a local weather record or storm report for the date of damage.
- Get a professional inspection report that distinguishes fresh storm displacement from long-term wear.
If the repair cost plus any interior damage lands below your deductible, filing a claim usually isn’t worth the premium impact.
A roofer’s take on the mistakes that cost homeowners the most
Most callbacks we see trace back to a tar patch over a symptom instead of a fix for the actual failure, or a crown crack nobody checked. A free inspection with photo documentation before any repair starts is what actually saves money.
How Crowleyexteriors Diagnoses and Fixes Flashing Leaks
You don’t need to guess which of the six failure modes is causing your leak. Crowleyexteriors’s inspection process is built to find it: a full attic and roof check, photo documentation of every stain and gap, and a written diagnosis that separates flashing failure from masonry or crown issues before any repair is proposed.

On inspection day, expect a technician to walk the attic first, then the roofline, then hand you clear scope options rather than a single vague number. Every estimate is itemized, so you can see what’s a reseal, what’s a full reflash, and what warranty backs each option. If the fix ties into broader roof replacement work, that gets flagged too, rather than patched around.
Ready to find out what’s actually causing the leak? Schedule a free inspection and have your photos and the timing of the last leak ready. It speeds up the diagnosis considerably.
Sources
- Chimney Flashing Leak: 6 Failure Modes & Repair Cost | TRB
- Chimney Flashing Cost Calculator (2026) — Single Flue to Oversize, Aluminum to Copper
- How Much Does Chimney Flashing Repair Cost? (HomeGuide)
- Is your chimney leak covered? Understanding homeowners insurance
- Chimney flashing repair vs replacement: when caulking is not enough