

Yes, house wrap belongs under vinyl siding on any home built to current code, because it forms the drainage plane that keeps water off your sheathing. That’s the short answer. The longer one is that a wrap only works as well as its installation. Reversed laps, missing flashing tape, or a punctured membrane can turn a code-compliant product into a wet-wall problem within a few seasons.
TL;DR:
- Proper installation of house wrap is crucial, with correct laps, flashing, and sealing to prevent water from reaching the sheathing.
- House wrap must meet permeance standards above five perms to be effective as a water-resistive barrier, ruling out household plastic sheeting.
- Different WRB materials handle water and vapor differently, with drainable wraps offering added protection in high-rain environments.
- Reusing existing wraps is feasible only if they are intact, properly lapped, and show no signs of water damage or mold.
- Installation flaws like reversed laps or missing flashing cause most failures, making proper flashing and seam taping more important than product choice.
Table of Contents
- What House Wrap Under Siding Actually Does
- Why Codes Require A Moisture Barrier Behind Vinyl Siding
- House Wrap Vs Foam Board: Comparing Common WRB Materials
- Installation Checklist For A Proper House Wrap Job
- Warning Signs Of A Bad House Wrap Installation
- When To Add Or Replace House Wrap During A Re-Siding Job
- What To Ask On A Siding Estimate
- How House Wrap Affects Energy Bills And Moisture Control By Climate
- Is House Wrap Environmentally Sustainable?
- Why Installation Quality Beats Product Choice Almost Every Time
- Get A Free Siding Inspection From Crowley Exteriors
- Sources
What House Wrap Under Siding Actually Does
A water-resistive barrier, or WRB, is the technical name for what most people call house wrap. It’s not the same thing as a vapor barrier, and mixing up the two causes real damage. A vapor barrier (like polyethylene sheeting) blocks moisture from passing through in either direction. A WRB does the opposite job: it keeps bulk water out while still letting water vapor escape from inside the wall cavity.
That distinction shows up in a number called permeance, measured in perms. Industry guidance from the Construction Specifier puts the WRB threshold above roughly 5 perms, which is why sealed plastic sheeting doesn’t qualify as house wrap, no matter how tightly it’s taped.
A properly functioning WRB handles three jobs at once:
- Sheds rain and wind-driven water away from the sheathing
- Lets trapped water vapor dry outward instead of soaking into wood
- Cuts down air leakage that drives up heating and cooling bills
Skip any one of those functions and you’re looking at rot, mold, or sheathing that loses its structural integrity years before it should.
Why Codes Require A Moisture Barrier Behind Vinyl Siding
Building codes didn’t always mandate a WRB behind cladding, and that gap explains a lot of the water damage found in older homes during re-siding jobs. Since the mid-2000s, the International Residential Code has required a water-resistive barrier behind exterior claddings, installed shingle-fashion, with specific lap sizes and integration into window and door flashing under Section R703.2.
That’s not a minor technicality. The code requires it because vinyl siding itself is not a waterproof assembly. It’s designed with weep holes and overlapping panels that let some water through by design, on the assumption that a WRB underneath will catch and redirect it. Remove the wrap, and vinyl siding becomes a decorative rain screen with nothing behind it to stop moisture from reaching the wood.
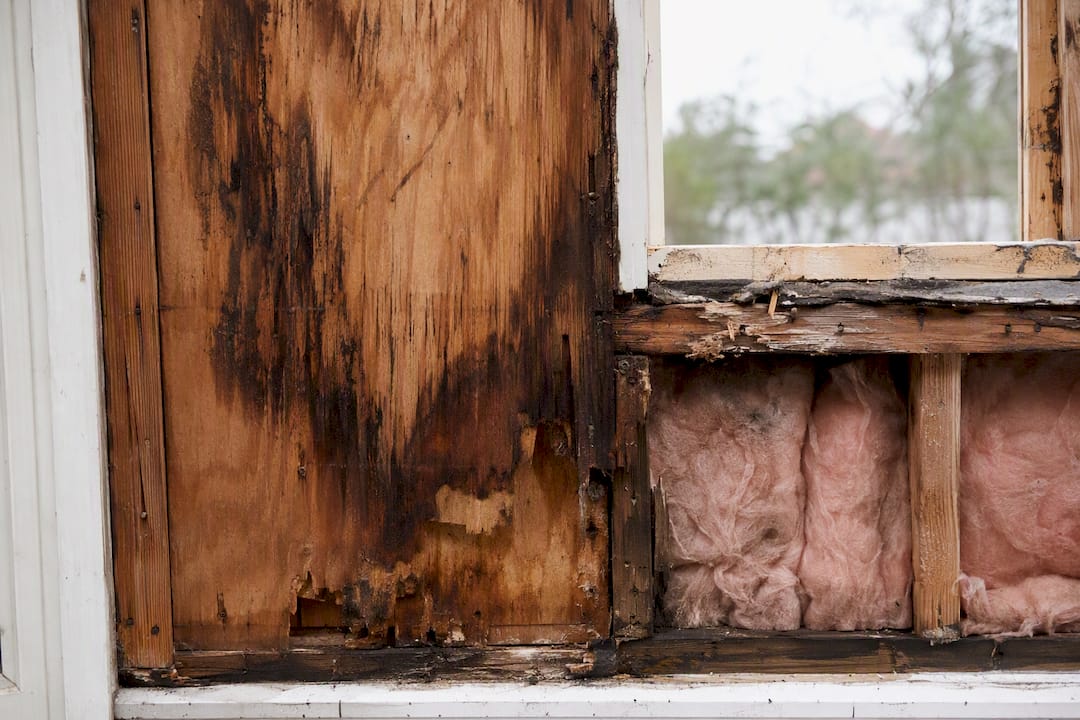
Permeance below 5 perms disqualifies a material as a WRB under most specifier guidance, which rules out household plastic sheeting as a substitute, even though some DIYers still try it. Homes built before code required a WRB often show the consequences during a tear-off: black-streaked sheathing, soft spots around window openings, and insulation that’s lost most of its R-value to years of trapped moisture.
House Wrap Vs Foam Board: Comparing Common WRB Materials
Not every WRB is the same product wearing a different label. The three main categories handle water and vapor differently, and picking the wrong one for your climate or siding type creates problems down the line.
- Asphalt-saturated felt (Grade D): The old standby. It absorbs moisture during a storm and releases it as conditions dry, which some building science researchers say gives it an edge during sustained wet-exposure events. It’s heavier, tears more easily during installation, and needs careful handling around staples.
- Perforated synthetic housewrap: Tiny holes let vapor pass through. Cheaper and common on production homes, but the perforations can also let in more air if seams aren’t taped.
- Nonperforated synthetic housewrap: Vapor moves through the material itself rather than through holes. Tougher, lighter, and generally the better all-around choice for vinyl siding.
- Drainable wraps: Textured or grooved surfaces that create a built-in drainage channel, tested for drainage efficiency under ASTM E2273. Worth the upgrade in high-rain climates or anywhere siding sits tight against the sheathing with no air gap.
House wrap vs foam board isn’t really an either/or choice. Rigid foam adds insulation value but still needs a separate WRB layer or a foam product rated and taped as its own drainage plane. They solve different problems.
Installation Checklist For A Proper House Wrap Job
Watching a crew wrap a house tells you a lot about whether the rest of the job will hold up. Here’s what correct installation actually looks like, step by step.
- Start at the bottom and work up. Each course of wrap must overlap the one below it shingle-fashion, so water sheds downward and outward instead of running behind a seam.
- Respect minimum laps. Horizontal laps typically need at least 2 inches of overlap; vertical seams need 6 inches, per code guidance under R703.2.
- Flash windows and doors in the right order. Sill pan or flashing goes in first, then the window unit, then side flashing, then head flashing last, with the WRB lapped over the top of the head flashing. Get this sequence backward and water gets trapped instead of shed. Our guide to roof flashing types covers the same shingle-lap logic applied to roofing details.
- Tape the seams if the wrap doubles as an air barrier. Manufacturer instructions usually call for taped seams and cap nails spaced roughly every 12 to 18 inches. Cap nails hold the wrap flat without tearing through it the way standard roofing nails can.
- Don’t leave wrap exposed too long. Most products carry a UV exposure limit, often 60 to 180 days, after which they degrade and need to be covered or replaced before siding goes on.
- Build in a drainage gap for vinyl siding. A gap of roughly 3/16 inch, created with textured wrap, a drainage mat, or vertical furring strips, equalizes pressure and lets water drain instead of pooling behind the panels.
Pro Tip: Ask your contractor which specific product they’re using and pull up its installation instructions before the crew starts. Lap sizes, fastener spacing, and UV exposure limits vary by manufacturer, and “we always do it this way” isn’t the same as following the spec sheet for that exact wrap.
Warning Signs Of A Bad House Wrap Installation
Most WRB failures trace back to the same handful of mistakes, and building science researchers note that even premium wrap can’t compensate for bad flashing or reversed laps.
- Laps installed upside down, so water runs into the seam instead of over it
- Seams left untaped where the product calls for taping
- Flashing missing entirely at window and door openings, or installed out of sequence
- Punctures, tears, or staple holes left unsealed
Inside the house, watch for peeling paint near windows, a musty smell in exterior walls, or soft drywall. Outside, look for staining beneath windows or siding panels that feel damp to the touch after a dry stretch. If you spot any of these, don’t guess. Pull a small siding section near the suspect area, photograph what you find, and schedule a professional inspection before the damage spreads to framing.
When To Add Or Replace House Wrap During A Re-Siding Job
A full re-wrap isn’t always necessary just because you’re replacing siding. If the existing WRB is intact, properly lapped, and shows no staining or soft spots, a contractor can sometimes patch small sections and reuse the rest.
Full replacement gets recommended once there’s visible evidence of past water intrusion, sheathing discoloration, or a home old enough to have been built before WRB requirements existed. Homes constructed before the mid-2000s frequently have no WRB at all, and re-siding is the natural point to correct that gap rather than seal new siding over bare sheathing.
Sequencing matters here. Siding comes off first, then the crew inspects sheathing condition, removes or repairs damaged wrap, replaces any rotted sheathing panels, and installs new WRB before a single piece of new siding goes up. A contractor who skips the sheathing inspection step and just re-wraps over existing damage is cutting a corner that will cost more later.
What To Ask On A Siding Estimate
A solid siding estimate should spell out exactly what WRB product will be used, how laps and flashing will be handled, what fastener type goes into the wrap, and what warranty coverage applies to the work, not just the siding itself.
DIY works fine for a simple wall section with no window penetrations. Once flashing sequencing, sheathing repair, or signs of existing moisture damage enter the picture, hiring a professional is the safer call. Free inspections often include checkpoints such as documenting sheathing condition and WRB status before quoting a siding job, so homeowners can understand the reasoning behind the estimate rather than just see a number.
How House Wrap Affects Energy Bills And Moisture Control By Climate
House wrap’s job changes depending on where you live, even though the material underneath the siding often looks identical from one region to the next. In humid climates, the priority is outward drying capacity. Specifiers often aim for a permeance in the 10 to 20 perm range for wall assemblies that need to dry quickly after a wall cavity picks up moisture, well above the roughly 5 perm code floor.
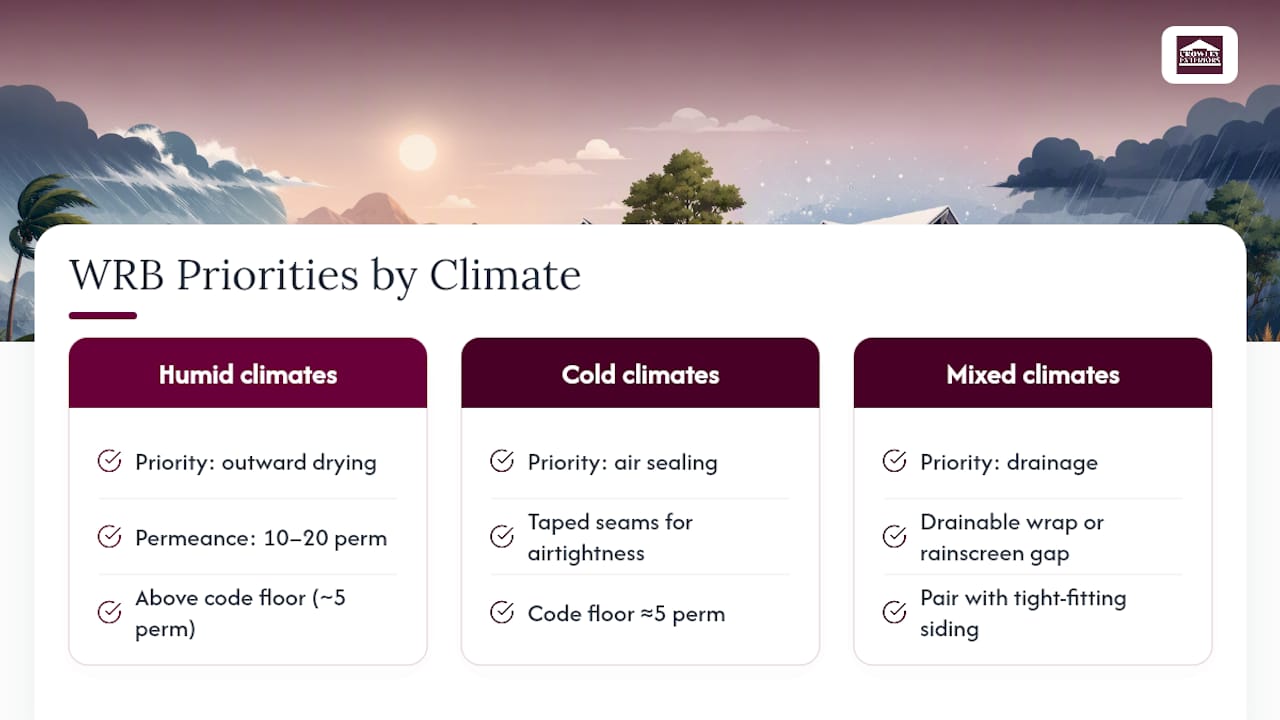
In colder climates, air sealing becomes the bigger lever on comfort and utility bills. A wrap with taped seams cuts drafts that would otherwise force a furnace to work harder, and that air barrier function often matters as much as the water resistance function during a Midwest winter.
Mixed and humid climates put more stress on drainage. When wind-driven rain is common, a drainable wrap or a rain-screen gap behind vinyl siding does more work than permeance numbers alone can capture, since it physically channels bulk water down and out rather than relying on the membrane to hold everything back. That’s the reasoning behind pairing drainable wraps with tight-fitting siding rather than treating every wall the same way regardless of exposure.
None of this means one product wins everywhere. It means the right WRB choice depends on whether your bigger risk is trapped vapor, air infiltration, or standing water at the base of the wall, and a contractor who asks about your specific exposure before recommending a product is doing the job correctly.
Is House Wrap Environmentally Sustainable?
House wrap doesn’t get much attention in sustainability conversations, but the material choice does carry real tradeoffs worth knowing about.
Asphalt-saturated felt is petroleum-based and heavier per square foot, which means more material and more transport weight for the same wall coverage. Synthetic housewraps are typically made from polyolefin plastics, lighter to ship, and often more durable during installation, which cuts down on tear-related waste on the job site. Neither material is currently designed for easy recycling once it comes off a house during a re-siding job, so most removed wrap ends up in construction debris.
The bigger sustainability story is indirect: a WRB that fails prematurely forces earlier sheathing replacement, and replacing rotted wood framing carries a far larger environmental cost than the wrap material itself ever did. Choosing a durable, correctly installed wrap the first time, rather than the cheapest roll on the shelf, is arguably the more meaningful sustainability decision homeowners actually control. A wrap engineered to drain bulk water, as building science coverage of moisture management points out, extends the service life of everything behind it, which matters more over a 30-year horizon than the embodied footprint of the wrap itself.
Why Installation Quality Beats Product Choice Almost Every Time
Homeowners spend a lot of energy comparing house wrap brands when the research points somewhere else entirely: installation quality drives outcomes far more than which product gets rolled out. A premium drainable wrap installed with reversed laps performs worse than basic felt paper installed correctly, and that’s not a close call.
The conventional advice online tends to frame this as a shopping decision, when it’s really a verification problem. Most homeowners can’t watch every hour of a siding job, so the practical move is asking the right questions before work starts and checking the right details once it’s done, the lap direction, the flashing sequence at windows, whether seams got taped where the manufacturer calls for it.
If there’s one thing worth prioritizing first, it’s flashing integration over wrap selection. A wrap only fails at its weak points, and those weak points are almost always at windows, doors, and seams, not across the flat field of wall where the membrane does its simplest job. Ask your contractor to show you the flashing sequence before the wrap goes on, not after you’ve already signed off on the finished wall.
— Mario
Get A Free Siding Inspection From Crowley Exteriors
If you’re planning a re-siding project, some contractors check key parts of the job that most estimates skip over: existing WRB condition, sheathing damage, and flashing integrity at every window and door before a single new panel goes up.

A free inspection may include documentation of the condition behind your current siding, whether an intact wrap needing patching or sheathing showing rot. This documentation can provide the basis for a no-obligation estimate outlining the WRB product, lap and flashing details, and warranty coverage before any commitment. If you’re weighing other exterior projects at the same time, our partners at One Day Doors & Closets have useful guidance on winterizing entry points, which pairs naturally with a siding and wrap upgrade. Ready to see what’s happening behind your siding? Schedule a free siding inspection or visit Crowley Exteriors to get started.
Sources
- Specifying the correct weather-resistant barrier – Construction Specifier
- Housewraps, felt paper and weather penetration barriers | UMass Building Technology
- The role of building wrap in managing moisture | BDC Network