

Three underlayment types cover almost every re-roof: asphalt-saturated felt, self-adhering (peel-and-stick) membranes, and mechanically attached synthetics. For ice-dam zones, use a self-adhering membrane rated to ASTM D1970; for general roof protection and long exposure before shingling, synthetic wins; felt still works where local code and budget allow it, but check your jurisdiction’s IRC rules and your shingle manufacturer’s fine print before you commit.
TL;DR:
- Self-adhering membranes meeting ASTM D1970 provide the best waterproof seal, especially at critical points like eaves, valleys, and around penetrations.
- Breathability remains an advantage of felt and some synthetics, but many synthetic products act as vapor retarders, risking moisture buildup if attic ventilation is inadequate.
- Higher-end synthetics are rated for 60 to 180 days of exposure, offering longer installation flexibility compared to felt, which typically requires shingling within days.
- Confirm that your local code mandates a self-adhering ice barrier extending at least 24 inches from the eaves, using approved products with proper ASTM certification.
- Proper attic ventilation must be verified before installing low-permeance underlayments to prevent condensation and moisture problems in the roof system.
Table of Contents
- Roof Underlayment Types Explained: Felt, Peel-and-Stick, and Synthetic
- Comparing Waterproofing, Breathability, and Durability
- What Codes Require for Ice-Dam Protection
- Installation, Ventilation, and DIY Risk
- Choosing the Right Underlayment: A Homeowner’s Checklist
- Why Trust This Guide
- An Editorial Take on Underlayment Advice
- Get a Professional Underlayment Assessment on Your Roof
- Sources
- FAQ
Roof Underlayment Types Explained: Felt, Peel-and-Stick, and Synthetic
Every asphalt-saturated felt roll carries a number that tells you its weight and durability. 15# felt (Type I) is thinner and cheaper; 30# felt (Type II) resists tearing better and handles foot traffic during installation without shredding. Felt is vapor-permeable, which helps a roof deck dry out, but it absorbs water, wrinkles in humidity, and degrades faster under prolonged sun exposure than the other two types.
Self-adhering membranes, often called peel-and-stick, use a rubberized asphalt adhesive backing that bonds directly to the deck and seals tightly around nail shanks. Products meeting ASTM D1970 are the standard reference point contractors look for, and this category is what most codes expect at eaves, valleys, and around chimneys or skylights.
Synthetic underlayment is a woven or non-woven polypropylene or polyethylene sheet, mechanically fastened with cap nails or staples. It weighs a fraction of felt, resists tearing during installation, and many products now carry ASTM D8257 certification, a newer standard covering water transmission, UV weathering, and thermal cycling.
- Felt (15# or 30#): budget-friendly, breathable, shorter UV exposure tolerance
- Self-adhering/rubberized: best nail-sealing, used at critical leak points
- Synthetic mechanically attached: lightweight, tear-resistant, longer exposure windows
Comparing Waterproofing, Breathability, and Durability
Waterproofing performance ranks self-adhering membranes above synthetics, with felt trailing behind. A self-adhering product seals around every fastener penetration on its own; synthetics rely on cap nails and taped seams to get close to that same seal, while felt simply is not designed to be watertight at fastener points.
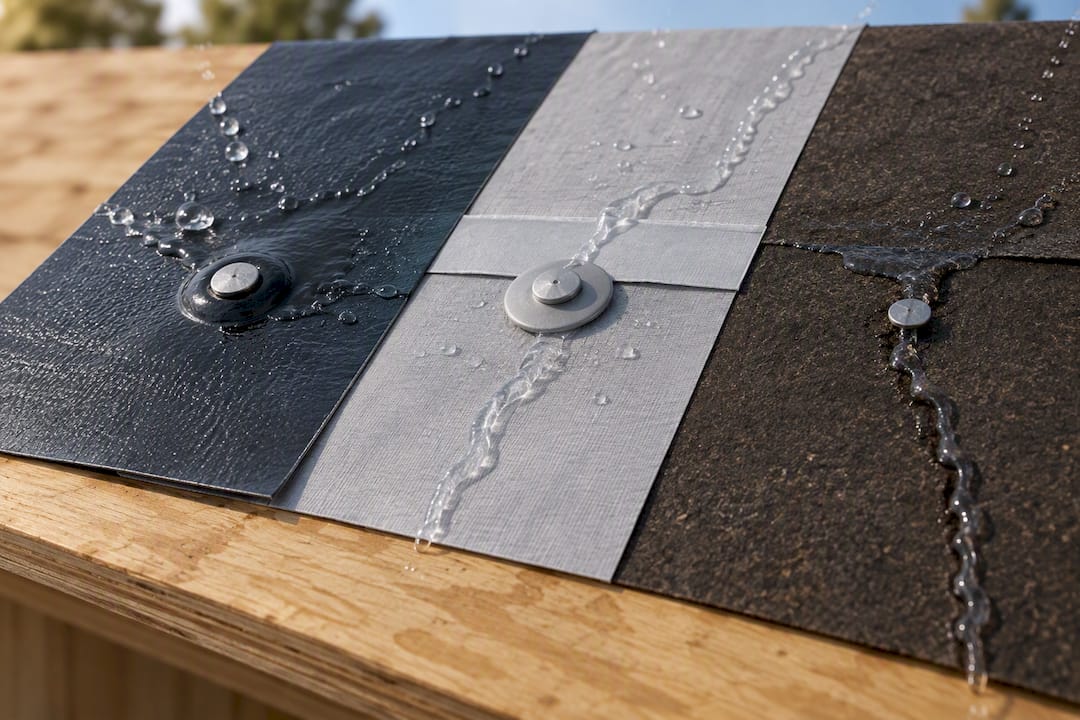
Breathability flips that order. Felt is naturally vapor-permeable, letting a roof deck release moisture from inside the attic. Some synthetics are nearly airtight.
Statistic to know: one manufacturer’s technical sheet on breathable synthetics reports a permeance rating near 0.05 perms for certain non-breathable synthetic products, essentially acting as a vapor retarder across the whole deck. That matters more than most homeowners realize.
- Waterproofing: self-adhering > synthetic > felt
- Breathability: felt > select “breathable” synthetics > standard synthetics
- Durability/tear resistance: synthetic > felt, with self-adhering strong but heavier
- Cost per square: felt lowest, synthetic mid-range, self-adhering highest
- Installer footing: smooth-surface membranes offer better traction; granular surfaces can get slick when wet
Weight and handling matter more than most buying guides admit. A roll of synthetic covers roughly ten squares at a fraction of the weight of felt, which cuts labor time and reduces the number of trips up the ladder. Self-adhering membranes are the heaviest and stickiest to work with, which is exactly why most homeowners hire this part out rather than DIY it.
What Codes Require for Ice-Dam Protection
The International Residential Code requires an ice barrier in any area where ice can accumulate along eaves, extending at least 24 inches inward from the exterior wall line measured from the roof’s edge. Some jurisdictions push that to 36 inches on lower slopes or in heavier snow zones.
Two products typically satisfy this rule: a self-adhering membrane meeting ASTM D1970, or two plies of felt cemented together per ARMA’s technical guidance. Either approach works, but the self-adhering option is faster to install correctly and less prone to installer error at seams.
Don’t assume your roofer’s word is enough; consult resources on Virginia roofing wind zones and tested roof assemblies to verify code-approved assemblies in coastal or windy areas. An IBHS review of ice-dam and code compliance found that many jurisdictions issuing permits do not actually inspect underlayment installation before it gets covered by shingles.
- Confirm your local building department’s minimum ice-barrier coverage before work starts
- Ask which product (brand and ASTM rating) will be used at eaves and valleys
- Request the manufacturer’s data sheet showing D1970 or equivalent compliance
- Ask whether the inspector will check underlayment before shingles go on, or only after
Our drip edge and eave detail guide walks through how ice barrier placement ties into edge flashing if you want the fuller picture.
Installation, Ventilation, and DIY Risk
Covering an entire deck in a low-permeance self-adhering or synthetic membrane changes how your attic breathes. If moisture can’t escape through the underlayment, it needs somewhere else to go, which is why ARMA’s steep-slope guidance ties self-adhering use to verified attic ventilation. Skip that check and you risk trapped condensation under the deck.
Exposure windows vary by product. Standard felt should be shingled within days. Higher-end synthetics can often sit exposed for 60 to 180 days depending on the manufacturer’s UV testing, useful if weather or scheduling delays the job.
- Check the weather window; never install underlayment on a wet or icy deck
- Verify attic ventilation before covering the whole roof in a low-permeance membrane
- Confirm the product’s rated exposure limit before you plan a multi-week gap before shingling
- Choose a smooth-surface membrane over granular if you or your crew will be walking the roof often
- Reroofing over old smooth-surfaced underlayment is often acceptable; granular surfaces usually need to come off first
Pro Tip: If your attic has poor airflow already, fix that before choosing a nearly airtight underlayment. Our ventilation troubleshooting guide covers the warning signs.
Choosing the Right Underlayment: A Homeowner’s Checklist
Match the product to your specific roof before you match it to a price tag. Slope, climate, and roofing material each push the decision in a different direction.
- Slope: low-slope sections often need self-adhering coverage, not just felt or synthetic
- Climate/ice risk: cold climates with eave icing need D1970 membrane at minimum, per code
- Roofing material: heavier tile or metal roofs may call for specific underlayment compatibility
- Ventilation: confirm attic airflow before choosing a low-permeance product deck-wide
- Exposure timeline: ask if your project timeline needs a long-exposure-rated synthetic
- Budget: felt costs less upfront but may cost more in code-driven double layers
When you talk to a contractor, ask specifically which ASTM standard their proposed product meets, how much overlap they use at seams, and whether they fasten or fully adhere at valleys. Request the manufacturer’s product data sheet and any code-approval documentation in writing. If a contractor can’t answer which standard their underlayment meets, treat that as a red flag. Our roof estimate checklist lists the other line items worth confirming before you sign anything.
Why Trust This Guide
This guide was written by Mario, drawing on Crowley Exteriors’ 25-plus years installing roofs across Missouri weather, including hard winters and hail. The company’s installers select underlayment based on local code requirements and climate exposure rather than a one-size-fits-all default.
An Editorial Take on Underlayment Advice
Most underlayment content treats this as a one-time purchase decision, when it is really a system decision. The membrane you pick interacts with your attic’s ventilation, your climate’s ice risk, and your shingle warranty terms. Get the underlayment right and get the ventilation wrong, and you’ve traded a leak risk for a condensation risk.
The conventional advice, “just go synthetic, it’s better,” is not wrong, but it’s incomplete. Synthetic wins on tear strength and exposure time. It does not automatically win on breathability, and a homeowner who deck-wraps an entire roof in a low-permeance product without checking attic airflow can create a moisture problem that never existed with felt.
Prioritize this first: confirm your ice-barrier coverage meets the IRC minimum for your slope and jurisdiction, then worry about brand and material. Code compliance at the eaves prevents the most expensive kind of failure. Everything else is optimization.
— Mario
Get a Professional Underlayment Assessment on Your Roof
Homeowners receive a written, itemized breakdown of exactly what underlayment their roof needs and why, rather than a generic bid.
During a free inspection, our team checks your current underlayment type, verifies ice-barrier coverage against code, and looks for ventilation issues that could affect which membrane makes sense for your reroof. If storm or hail damage is part of the picture, we also help document it for your insurance claim. As a family-owned company with more than 25 years in Missouri weather, we back the work with a 25-year guarantee and no-obligation, transparent pricing before anything gets scheduled.
Ready to find out what’s under your shingles? Schedule your free roof inspection and get a straight answer on what your roof actually needs.
Sources
- International Residential Code (IRC) 2021 — Section R905.1.2
- New ASTM standard tests the performance of synthetic underlayments | Roofing Contractor
- Ice dams and building codes report — IBHS
FAQ
Is Synthetic Underlayment Better Than Felt?
Synthetic underlayment generally outperforms felt on tear strength, weight, and UV exposure tolerance, with some products rated for 60 to 180 days of exposure. Felt remains cheaper and more breathable, so the better choice depends on your climate, budget, and how long the deck will sit exposed before shingling.
Do I Need Ice and Water Shield on My Roof?
If you live where ice can form along your eaves, the IRC requires an ice barrier extending at least 24 inches inward from the exterior wall, and a self-adhering membrane meeting ASTM D1970 is the most common way to satisfy that. Skipping it in an ice-prone area risks both code violations and water damage under your shingles.
Can I Install Roof Underlayment Myself?
Synthetic underlayment is the most DIY-friendly option because it’s lightweight and mechanically fastened rather than adhered. Self-adhering membranes at valleys and eaves are trickier to seal correctly, and most homeowners are better off having a professional handle those critical areas.
How Long Can Synthetic Underlayment Be Left Exposed?
It depends entirely on the product, but higher-end synthetics carrying ASTM D8257 testing can often handle 60 to 180 days of UV exposure before shingling. Always check the manufacturer’s data sheet rather than assuming, since exposure limits vary widely between brands.
What Does Crowley Exteriors Charge for a Roof Inspection?
Crowley Exteriors offers free roof inspections and no-obligation estimates for homeowners in St. Charles County. Pricing for repairs or replacement work is provided after that inspection, so reach out through their services page for a current quote tailored to your roof.
Recommended
- IRC Drip Edge: Contractor Verified Checklist For Homeowners & Pros
- Emergency Roof Tarping: A Safety-First Guide For Homeowners
- 10 Roof Flashing Types Every Homeowner Should Know
This article was prepared with AI assistance for general information. For recommendations specific to your property, contact Crowley Exteriors. Call or text us at 314-839-3800.